Steam is one of the world’s largest digital distribution platforms, but users often report that they are unable to connect Steam network. If you also have this problem, you come to the right place. In this post, NewsPivot offers you 5 solutions to this issue.
Solution 1. Check Your Network
First of all, if the “Unable to connect to Steam network” issue occurs, the easiest way is to check the network. It may a network connection error. Check whether the network connection is normal, try changing the network or reconnecting, and then try logging in to Steam.
Solution 2. Disable Firewall or Antivirus Temporarily
After finding that everything on the network is normal, you are still unable to connect to the Steam network. This may be related to the firewall or anti-virus software. When logging into Steam, temporarily turn off the firewall and anti-virus software, and then try to log in to the Steam platform again.
Solution 3. Modify Steam Properties
You can try to modify the Steam properties to solve the Steam connection error. For that, you can right-click the Steam icon and select Properties. Then switch to the shortcut, and add -tcp to the target column. There is a space in front of -tcp. Finally, click OK.
You may also like: 9 Methods to Resolve Steam Remote Play Not Working
Solution 4. Delete All Files in the Steam Package
Too many package folder caches in the Steam installation package will also result in the Steam connection error.
Step 1: Open the folder where Steam is installed, open the package folder.
Step 2: Delete all files under the steam installation directory package. Such as C:\Program Files (x86)\Steam\package\.
Step 3: After deleting it, restart the Steam platform client and wait for the Steam platform update.
Solution 5. Change DNS Settings
Try changing your computer’s DNS settings to use Google’s public DNS or another reliable DNS service. This helps resolve issues that may be related to the DNS service provided by your ISP. The following will introduce a method on how to change DNS.
Step 1: Press the Win + I keys on the keyboard to open the Settings app.
Step 2: Look for Network & Internet (Wi-Fi, airplane mode, VPN) and click on it.
Step 3: Select Ethernet (in some devices, it is displayed as Wi-Fi) from the left sidebar.
Step 4: Look for the Related settings area on the right panel.
Step 5: Click Network and Sharing Center link under it.
Step 6: Select Change adapter settings from the left sidebar.
Step 7: Your network connections will be listed in order.
Step 8: Right-click on the certain network and choose Properties.
Step 9: Keep the Networking tab selected and choose Internet Protocol Version 4 (TCP/IPv4) under This connection uses the following items.
Step 10: Click on the Properties button below.
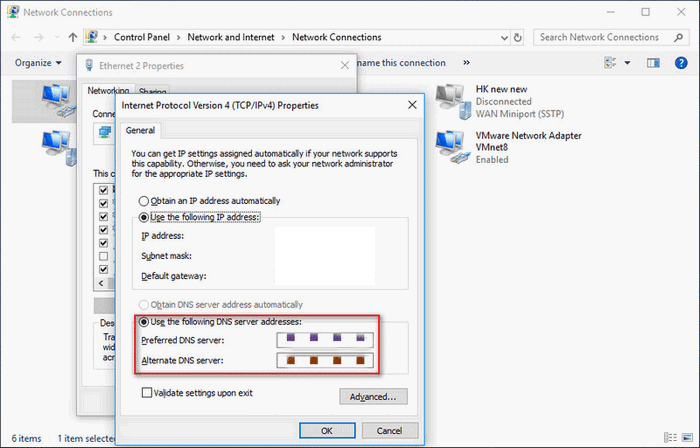
Step 11: Check Use the following DNS server address, instead of Obtain DNS server address automatically.
Step 12: Set the Preferred DNS server to 8.8.8.8 and set the Alternate DNS server to 8.8.4.4.
Step 13: Click on the OK button at the bottom to confirm changes.

Also read: 7 Effective Ways to Fix App Store Disappearing from iPhone
Bottom Line
When you are unable to connect to Steam network, you can just use the methods mentioned above to solve the issue. Anyway, I hope these methods can help you solve Steam connection error. I hope you enjoy the Steam game.