Can You Install Ubuntu Desktop on Raspberry Pi 5/4/400?
Raspberry Pi OS is not the only operating system that can run on a Raspberry Pi 5/4/400. For example Ubuntu Desktop is probably a good alternative. Although it is not as good as the official distribution, it still can work well with the Raspberry Pi. However, do you know how to install Ubuntu desktop on Raspberry Pi?
In this tutorial from NewsPivot, we will show you the process of installing Ubuntu Desktop on a Raspberry Pi device, such as Raspberry Pi 4, Raspberry Pi 400, and Raspberry Pi 5.
What Things Do You Need to Prepare?
Ubuntu is available in Raspberry Pi Imager, under Other general-purpose OS. It can be installed on a microSD card from there. Currently, it is recommended to install Ubuntu on Raspberry Pi 5, 4, or 400.
You need to create a bootable Ubuntu desktop SD card and then use it to install Ubuntu on Raspberry Pi 4. So, you need to prepare the following things:
- A microSD card (9GB minimum, 16GB recommended)
- A computer with a microSD card drive
- A Raspberry Pi 4
- A micro USB-C power cable
- A monitor with an HDMI interface
- A micro HDMI cable
- A USB keyboard
When everything is prepared, you need to proceed with the following steps.
Step 1: Create a Bootable Ubuntu Desktop MicroSD Card
Follow this guide to create a bootable Ubuntu desktop microSD card:
1. Connect the card to your PC via a card reader.
2. Install the right Raspberry Pi Imager for your operating system.
If you are running Ubuntu, you need to run the following command in the Terminal:
sudo snap install rpi-imager
However, if you are running other operating system, you will need to download a special Raspberry Pi Imager:
- Raspberry Pi Imager as a deb package: https://downloads.raspberrypi.org/imager/imager_latest_amd64.deb.
- Raspberry Pi Imager for Windows: https://downloads.raspberrypi.org/imager/imager_latest.exe
- Raspberry Pi Imager for macOS: https://downloads.raspberrypi.org/imager/imager_latest.dmg
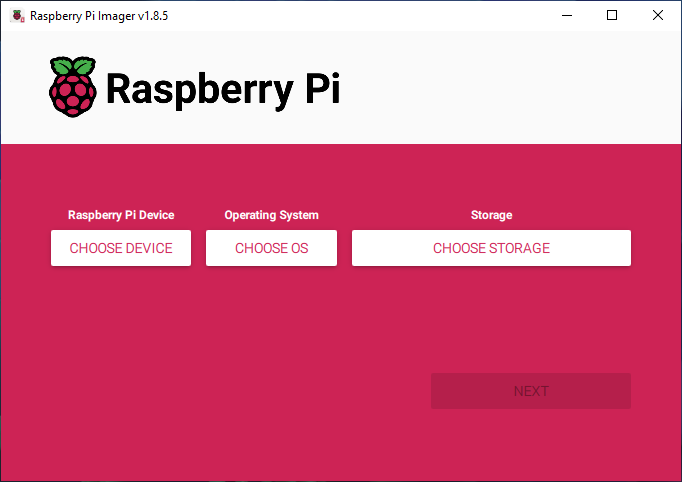
3. Run the Raspberry Pi Imager and you will see the following interface. First, click CHOOSE DEVICE to expand the menu.
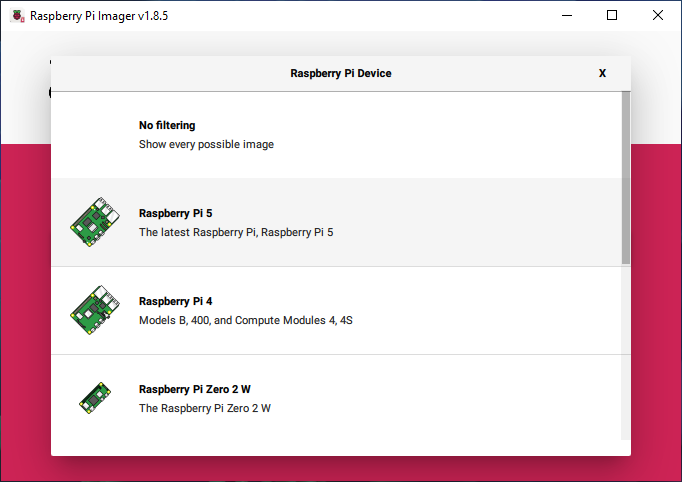
4. Click the Raspberry Pi device you want to install on. For example, if you want to install Ubuntu desktop on Raspberry Pi 5, you should select Raspberry Pi 5. However, if you want to install Ubuntu desktop on Raspberry Pi 4/400, you need to select Raspberry Pi 4.
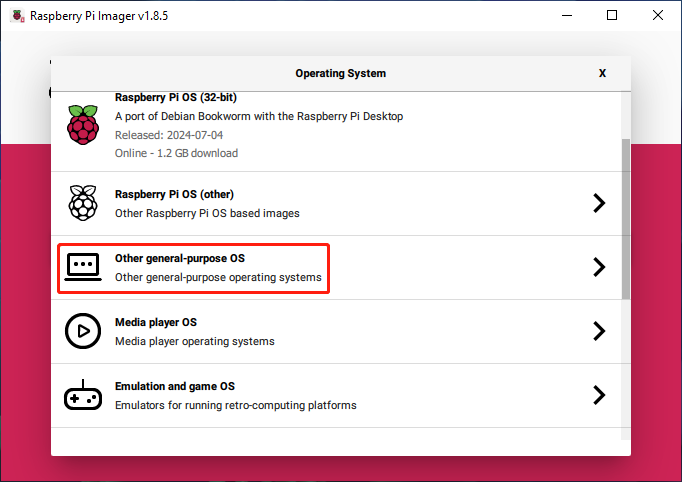
5. Expand CHOOSE OS and then select Other general-purpose OS.
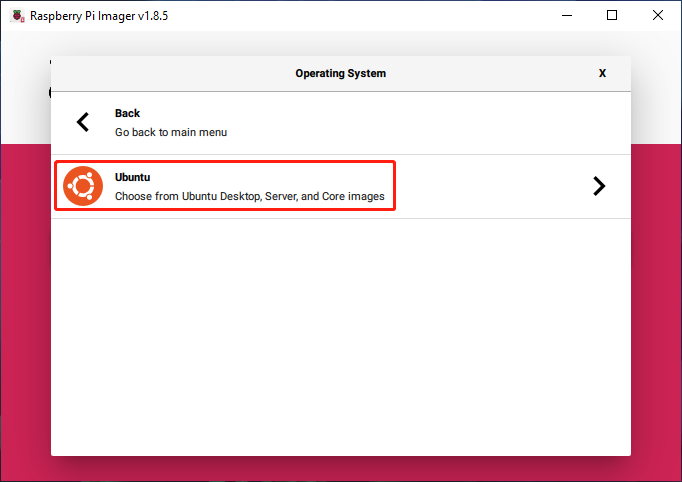
6. Click Ubuntu on the next page.
7. Since you want to install Ubuntu desktop on Raspberry Pi, you need to select Ubuntu Desktop 24.04 LTS (64-bit) to continue. You can see that this Ubuntu desktop operating system is for RPi 4/400/5 models with 4Gb+.
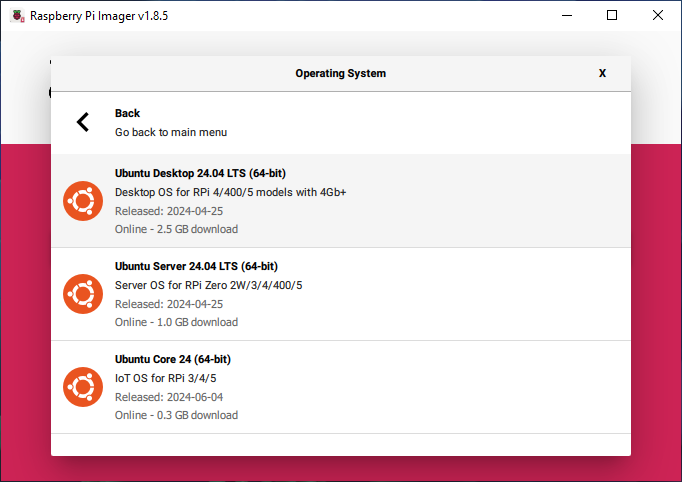
8. Click CHOOSE STORAGE and choose the connected SD card on the pop-up interface.
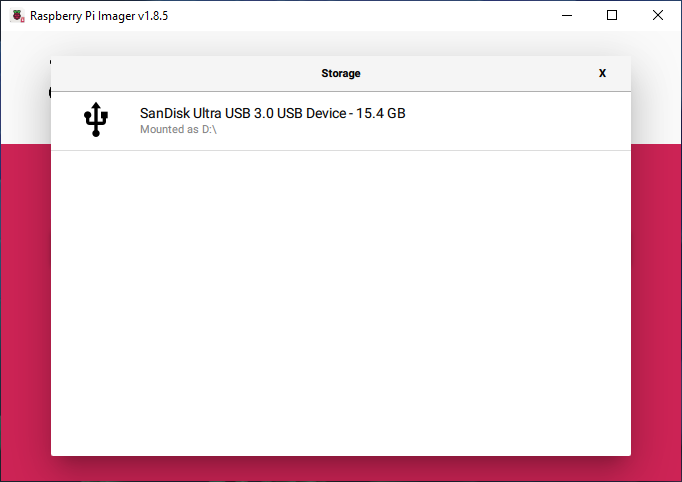
A warning will pop up to tell you that all files on the card will be erased. You need to click the YES button to continue if there is no important data needs to the handle.
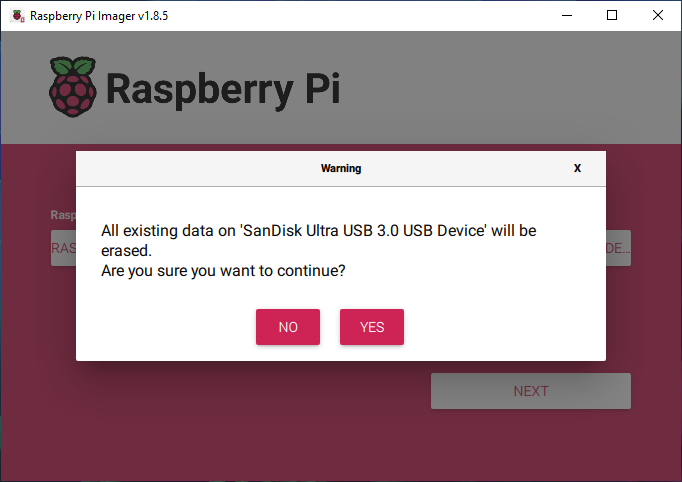
9. Now, you will go back to the main interface of the Raspberry Pi Imager interface. Click the Next button to start the image writing process. The writing process will take a few minutes. Just wait.
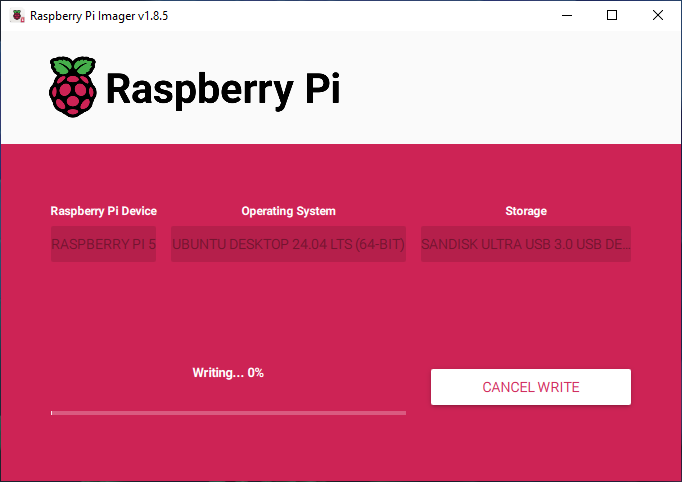
Step 2: Boot into the Ubuntu Desktop from the microSD Card
Now, you have successfully created a bootable Ubuntu SD card. Next, you need to boot your Raspberry Pi from the card and install Ubuntu desktop on Raspberry Pi 400/4/5.
Before doing this, you need to ensure that your Raspberry Pi is powered off. Then insert the microSD card into the Pi. The card is what the Pi uses to load all the software you are going to use.
Next, follow this guide to boot your Pi to the Ubuntu desktop.
1. Plug in the HDMI screen and a USB keyboard.
2. Plug in and power on your Raspberry Pi. You will see the boot process and then the first run wizard.
3. Set the language.
4. Set your keyboard layout. You can use the ‘@’ and ‘“’ keys for British and American keyboards to check if they are in the right place for you.
5. Select your timezone.
6. Set up a user and a password for the system.
Now, you have successfully installed Ubuntu desktop on Raspberry Pi 5/4/100. Just enjoy it now.
Boot from an External SSD Using a USB Connection (Optional)
Usually, the capacity of an SD card is limited. To improve the performance of your Raspberry Pi device and get more space, you can use an external USB SDD with your Pi.
All 8GB Raspberry Pi 4/400/5 devices and newer 4GB models are pre-configured to boot from a USB drive automatically as long as no SD card is inserted.
Well then, how to make your Pi boot from an external USB SSD? It is the same as for an SD card.
1. Download the right Raspberry Pi Imager according to the operating system you are running on the computer. You can find the download links in Step 1. However, if you are planning to create a bootable SSD on Ubuntu, just run this command: sudo snap install rpi-imager.
2. Use the Imager to create a bootable Ubuntu SSD. The exact steps are the same as the ones introduced in Step 1. We will not repeat them here.
3. Connect the SSD to your Raspberry Pi, then power on your Pi. It will automatically boot from the SSD. Use the instructions in Step 2 to set up Ubuntu desktop.
Now, you successfully installed Ubuntu desktop on Raspberry Pi. Next time, your Raspberry Pi will boot from the SSD. You can enjoy better performance and larger capacity.
Bottom Line
How to install Ubuntu desktop on Raspberry Pi 4/400/5? This post gives you two options: use a microSD card or use a USB external SSD. You can select one device based on your situation.