Want to install Ubuntu Server on your computer? NewsPivot supplies a full guide here.
About Ubuntu Server
Ubuntu Server is a variant of standard Ubuntu. However, unlike the Ubuntu desktop, it is tailored for networks and services. It can not only run a simple file server but also operate within a 50,000-node cloud.
The installation of the Ubuntu Server is not like installing the Ubuntu Desktop. There is no graphical installation program for the Ubuntu Server installation. It is a text menu-based process.
Well then, how do you install Ubuntu Server? Is it easy to do this? This post will walk you through a full guide on installing Ubuntu Server, including where to download the Ubuntu Server image, create a Ubuntu Server bootable USB drive, set up Ubuntu Server installation, and other related information.
Preparations before Installing Ubuntu Server
Check the system requirements
You can install and run Ubuntu Server on a wide range of hardware like virtual machines, personal computers, and enterprise-scale computing. However, your device should meet the following requirements if you want to install Ubuntu Server:
Architecture
Ubuntu Server is compatible with various 64-bit architectures and 32-bit arms:
- amd64 (64-bit Intel/AMD)
- arm64 (64-bit Arm)
- armhf (32-bit Arm)
- ppc64el (64-bit Power)
- riscv64 (64-bit RISC-V)
- s390x (64-bit Mainframe)
Here is the full list of Ubuntu certified servers.
The following parameters are for the installation of Ubuntu 24.04 Noble amd64 ISO. If you want to install other versions of Ubuntu, architectures and deployment methods might differ slightly.
Memory
The following requirements depend on the system hardware and setup:
>> Minimum RAM: 1024 MB
However, it may need more memory than the above minimum if you, for instance, have more hardware to initialize, more complex setup plans, or are using other architectures.
So, more memory is needed:
>> Suggested minimum RAM: 3 GB or more
Storage
The Ubuntu Server installation needs enough available free disk space. Here are the basic requirements:
>> Minimum storage: 5 GB (ISO installs)
>> Minimum storage: 4 GB (cloud images)
Your system may require more memory than the basic requirement. For example, if the setup has complex plans or additional software, the available disk space should increase.
In this case, more free space is asked:
>> Suggested minimum storage: 25 GB or more
DVD or USB Flash Drive Access
You need to create a bootable Ubuntu Server DVD or USB flash drive for Ubuntu Server installation on a computer. So, your device should have access to either a DVD or a USB flash drive.
Back up Your Data
If you want to install Ubuntu Server but also need to keep your data, you should back up your data in advance. For example, you can simply transfer files to another storage device. Alternatively, you can use your installed or system build-in tools to make a backup of your data.
When everything is prepared, you can start the Ubuntu Server installation process.
Step 1. Download Ubuntu Server ISO Image and Etcher
Get Ubuntu Server ISO Image
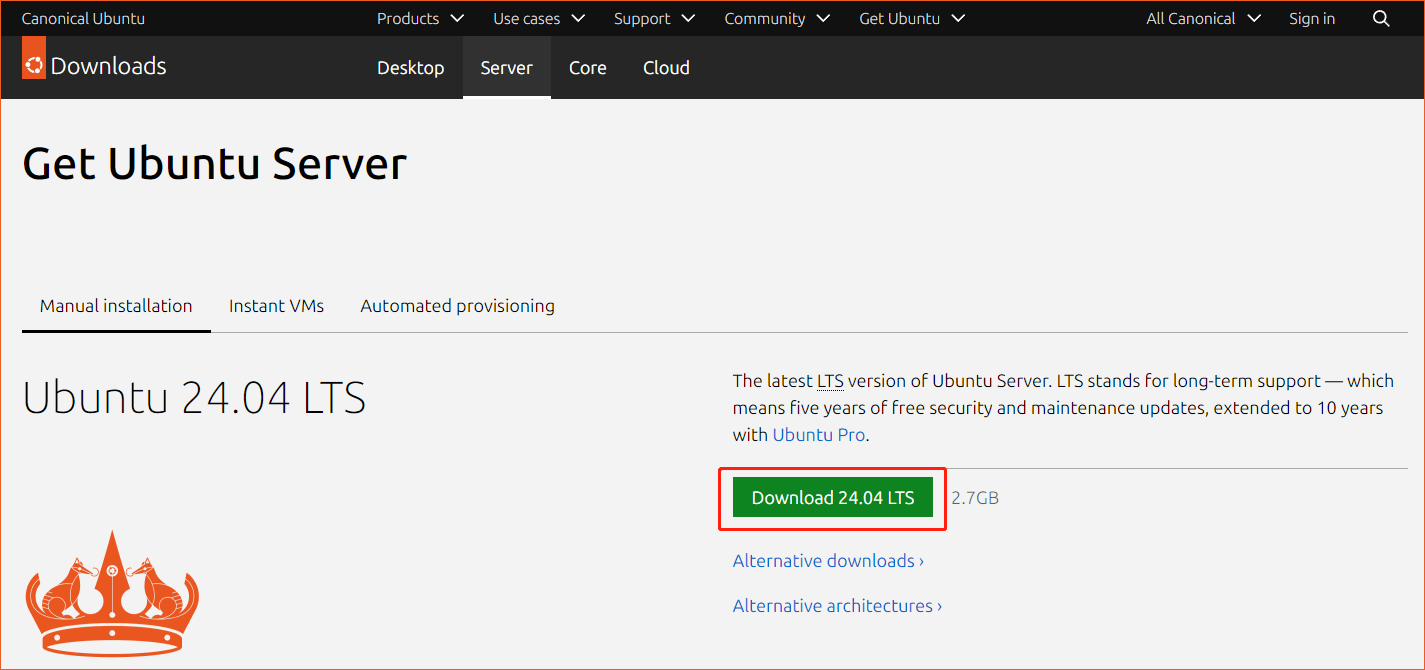
1. Go to this page: https://ubuntu.com/download/server.
2. Click the Download 24.04 LTS button. You can also see that the size of the Ubuntu Server ISO image is about 2.7GB.
3. The downloading process will start and it may take a few minutes, so, you should wait patiently until the whole process is completed.
The Ubuntu Server ISO image will be saved to the default Downloads folder.
Download and Install balenaEtcher
BalenaEtcher is an SD card flasher app that helps its users create a USB installation medium using an ISO image. You can use it to create a bootable USB drive using the downloaded Ubuntu Server ISO image. After that, you can use it to install Ubuntu Server on your device.
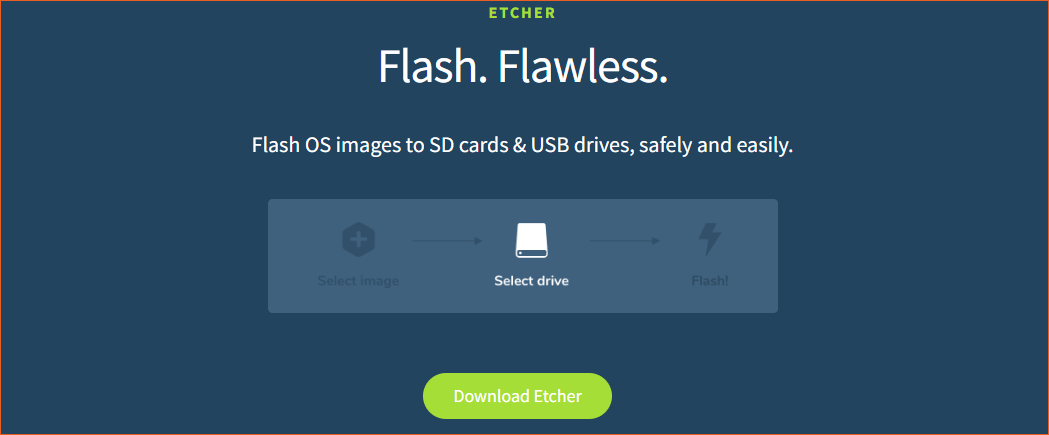
Just go to this page https://etcher.balena.io/ and click the Download Etcher button to get the Etcher setup file. Then, run this file to install Etcher on your computer.
Step 2. Create a Bootable Ubuntu Server Medium
In this post, we use a USB flash drive as the installation drive for Ubuntu Server. However, if you want to create an Ubuntu installation DVD on Windows, you should refer to this guide: How to burn a Ubuntu DVD on Windows.
1. Connect the USB flash drive to your computer via a USB table.
2. Run the Etcher tool.
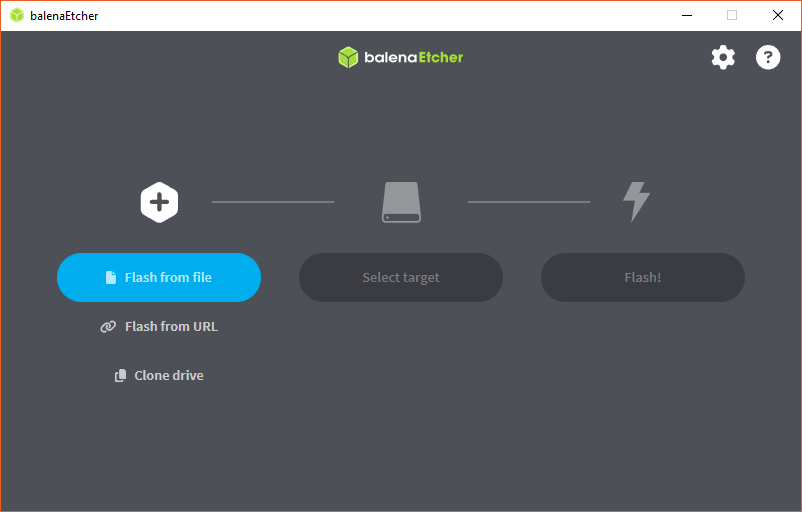
3. Click Flash from file and select the downloaded Ubuntu Server ISO file from your computer.
4. Click Select target and select the connected USB flash drive.
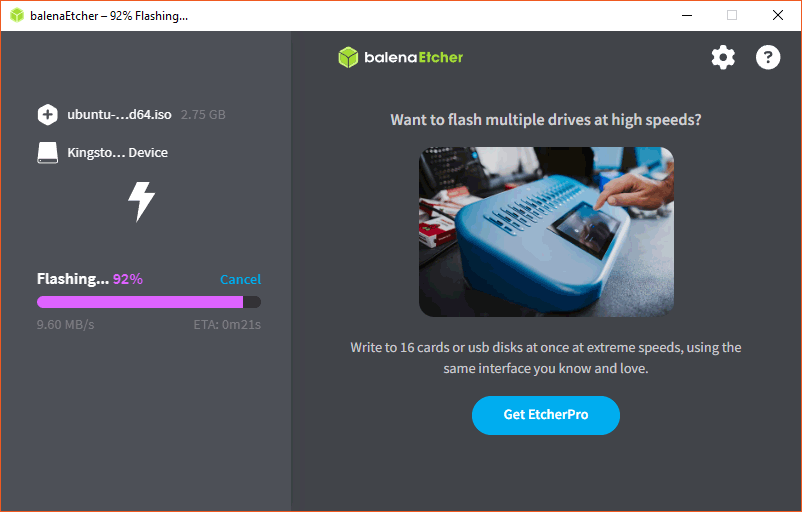
5. Click Flash! to flash the Ubuntu Server ISO image to the USB drive.
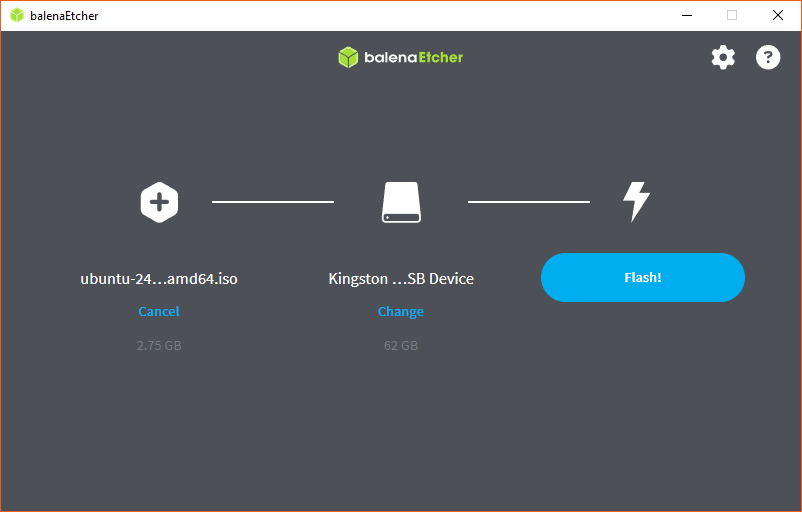
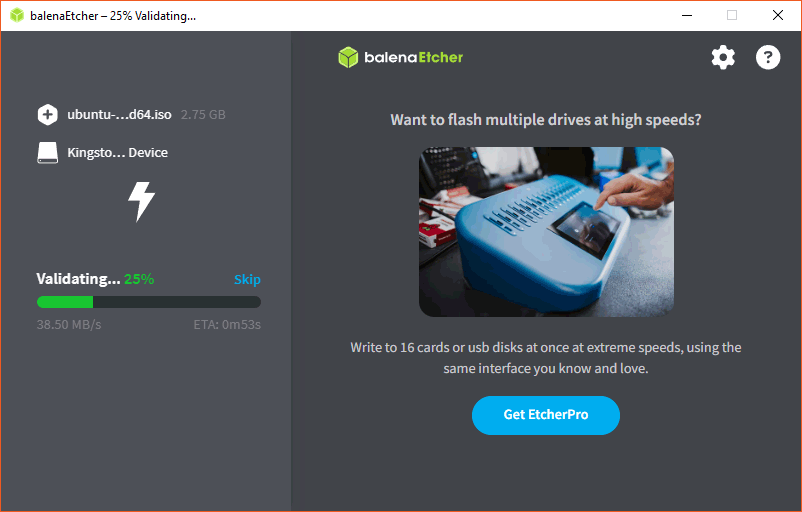
The flashing process will last for some minutes.
After flashing, this tool will begin to validating process to check if the flashing is successfully.
Step 3. Install Ubuntu Server Using the Ubuntu Bootable USB Drive
Now, it’s time to trigger the installation process. Use these steps to start the Ubuntu Server setup:
1. Connect the bootable USB drive to the computer that you want to install Ubuntu Server on.
2. Set your computer to boot from the USB drive. The screen will tell you which key you can press to boot into the boot menu. The key could be Escape, F2, F10, or F12 depending on the computer manufacturer. After powering on your device, you should hold that key until you see the boot menu. Then, select the USB as the boot drive.
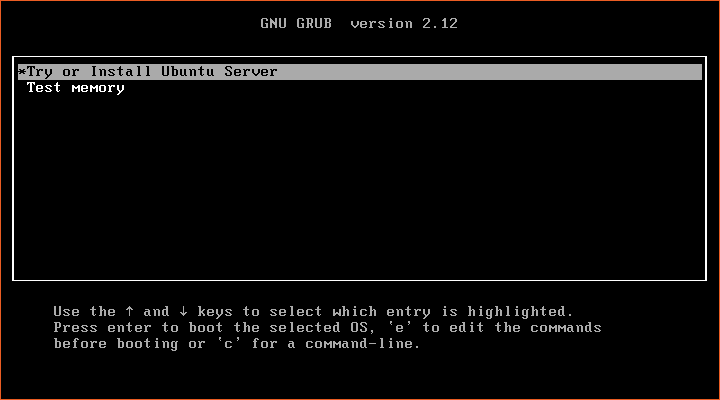
3. If you see the following interface, press Enter to continue. However, if Install Ubuntu Server is not selected by default, you need to use the ↑ and ↓ keys to highlight this option.
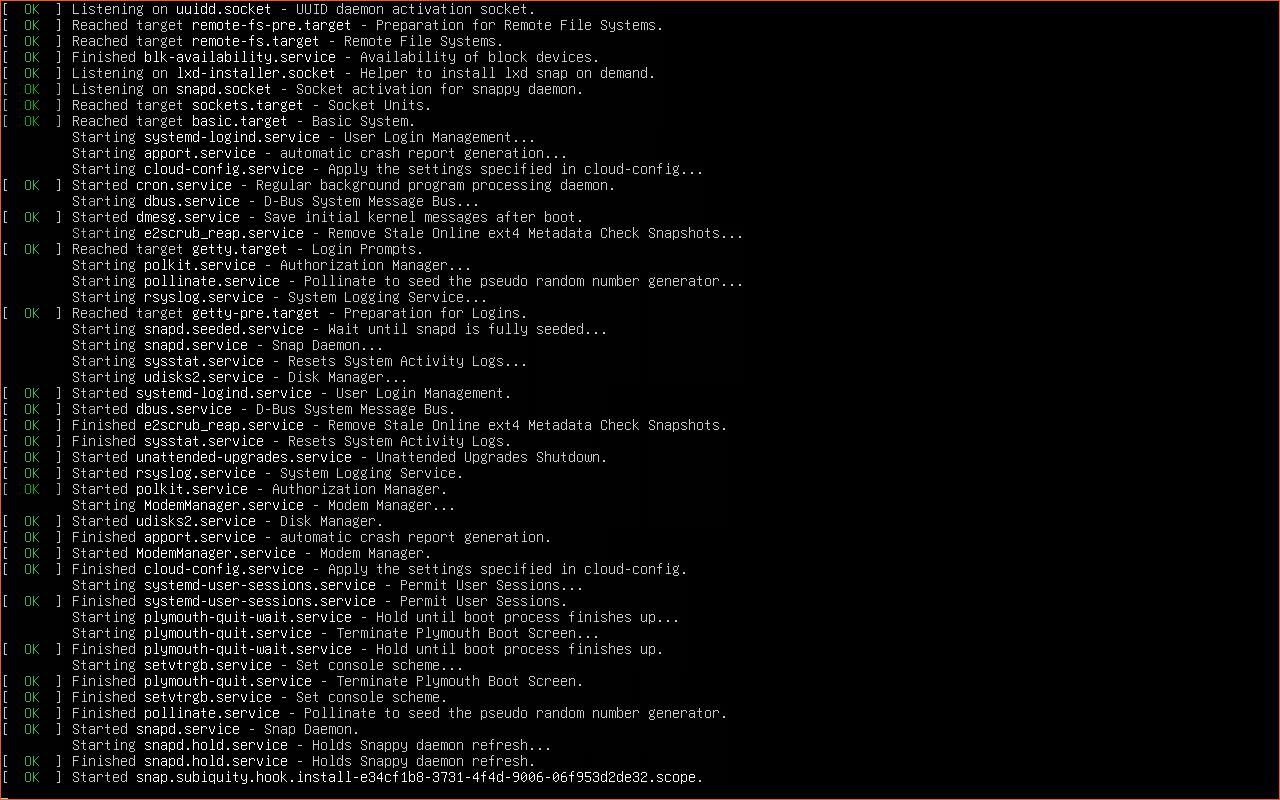
4. You will see the following screen. It’s normal. Just wait until you access the language selection page.
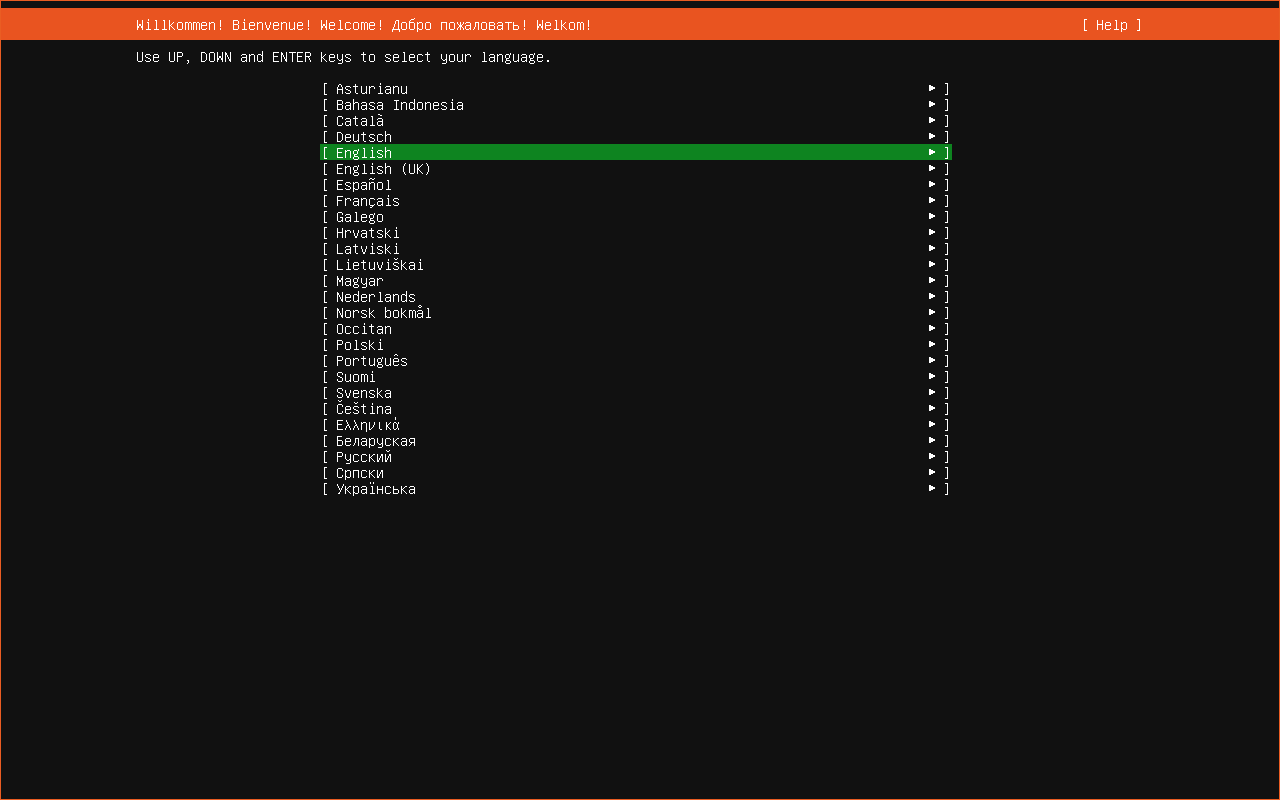
5. Use the ↑, ↓, and Enter keys to choose and confirm your language.
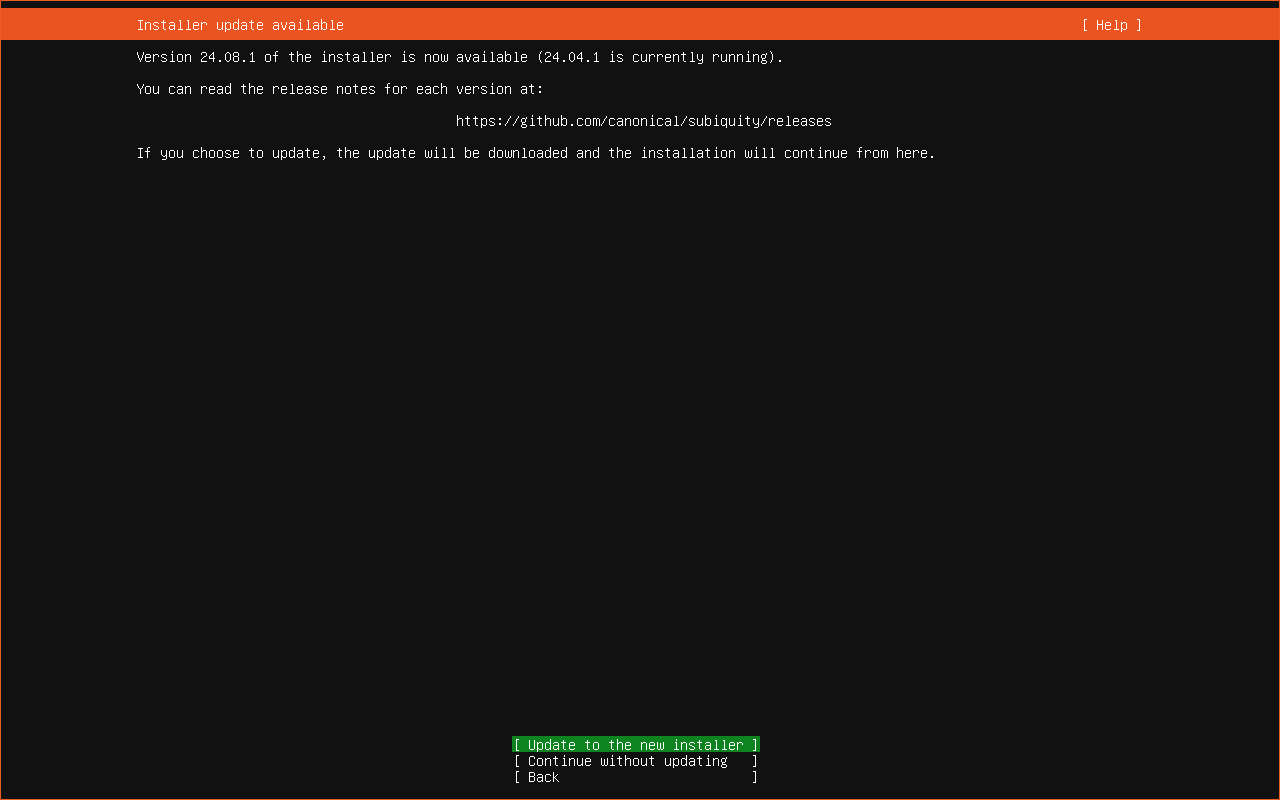
6. The following screen informs that the Installer update is available. You can find the Update to the new installer and Continue without updating options at the bottom. Use the ↑ and ↓ keys to highlight your needed option and press Enter to continue. Here, we select Update to the new installer.
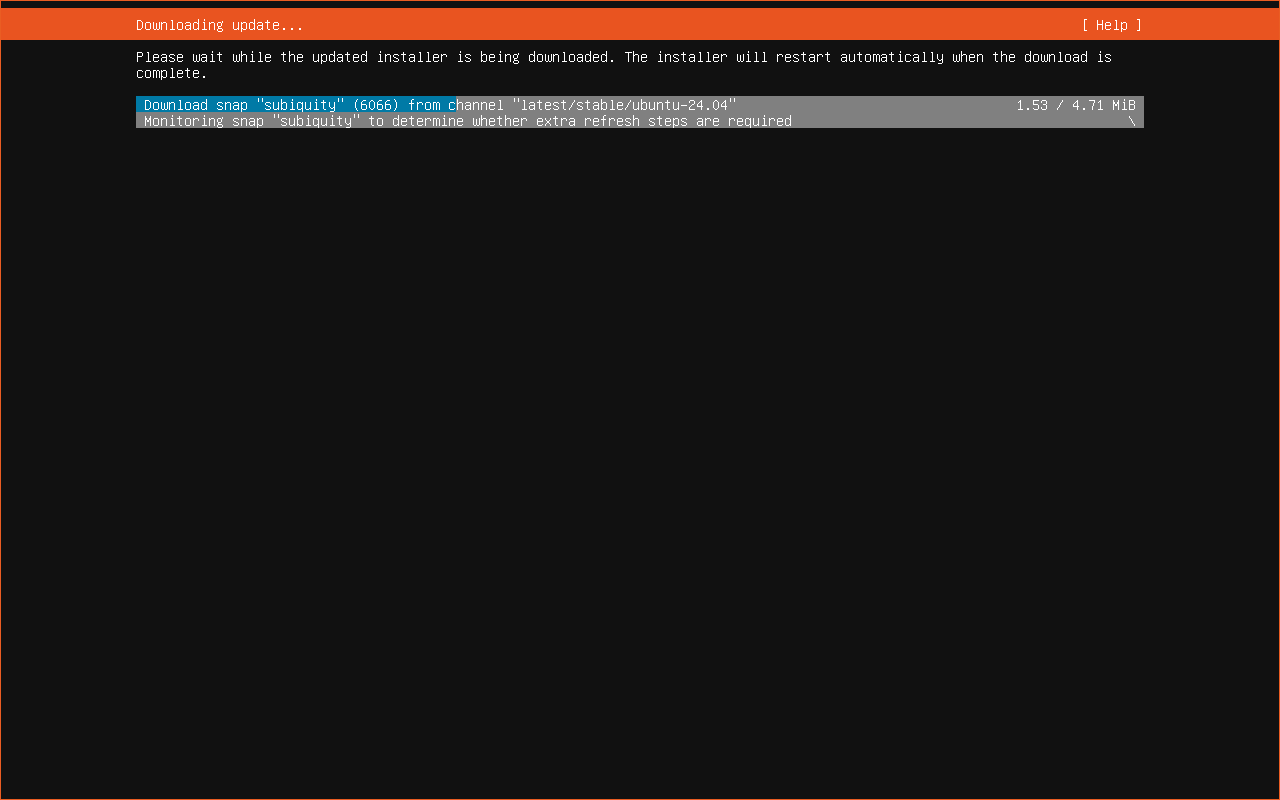
The update downloading process will start. After that, the installer will automatically restart. Just wait.
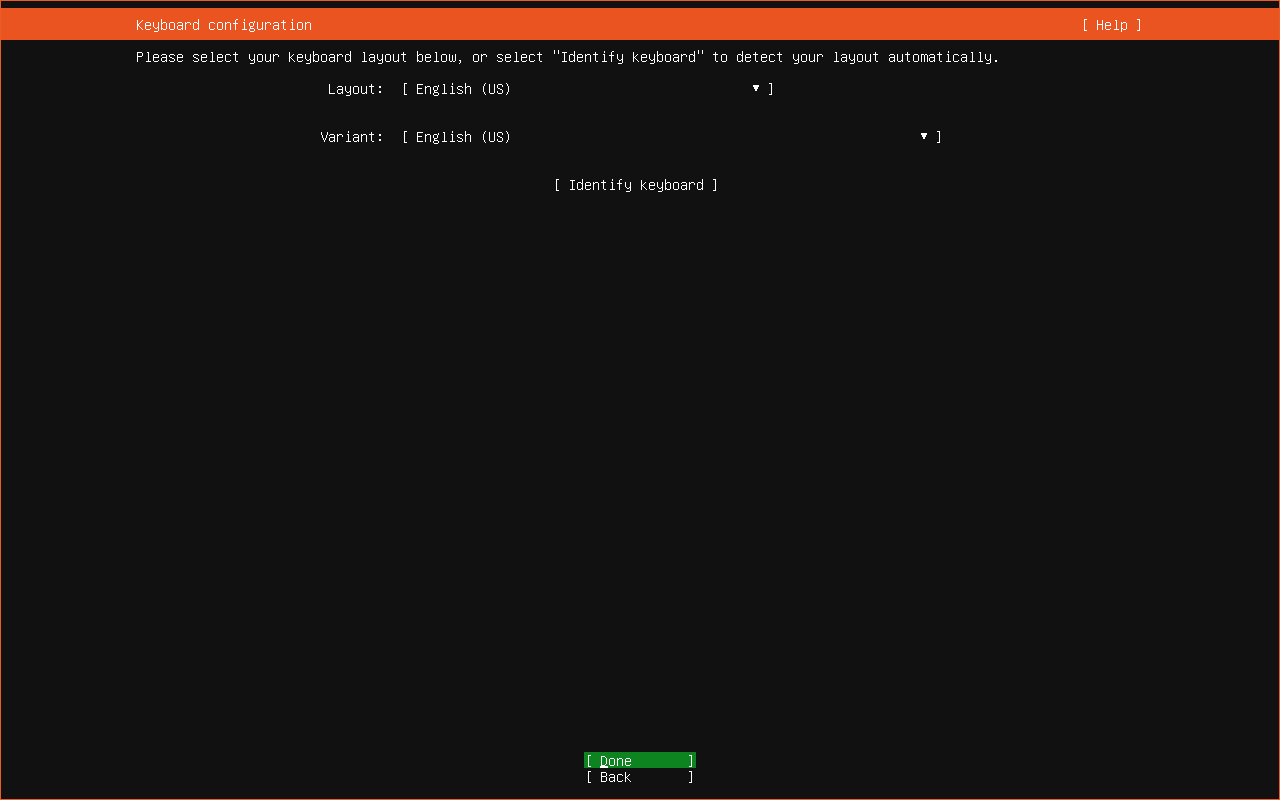
7. The next screen is keyboard configuration. Likewise, use the ↑, ↓, and Enter keys to choose the layout language and the variant language. Alternatively, you can highlight Identify keyboard and follow the onscreen guide to automatically detect the layout. Once everything is OK, highlight Done and press Enter to go to the next page.
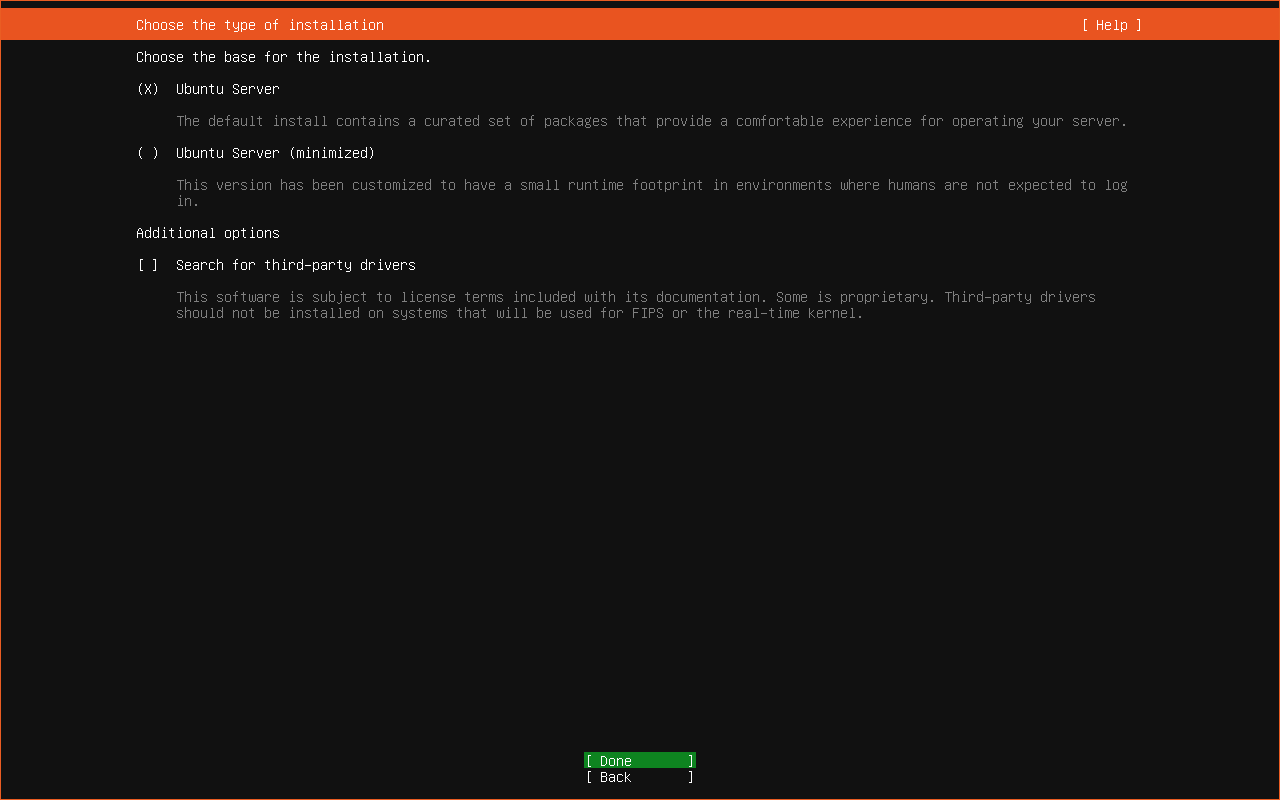
8. Now, it’s time to choose the Ubuntu Server installation type. Here are two types: Ubuntu Server and Ubuntu Server (minimized). At the same time, you can find one additional option: Search for third-party drivers.
- Ubuntu Server: The default install contains a curated set of packages that provide a comfortable experience for operating your server.
- Ubuntu Server (minimized): This version has been customized to have a small runtime footprint in environments where humans are not expected to log in.
- Search for third-party drivers: This software is subject to license terms included with its documentation. Some is proprietary. Third-party drivers should not be installed on systems that will be used for FIPs or the real-time kernel.
Use the ↑, ↓, and Enter keys to choose your desired installation type.
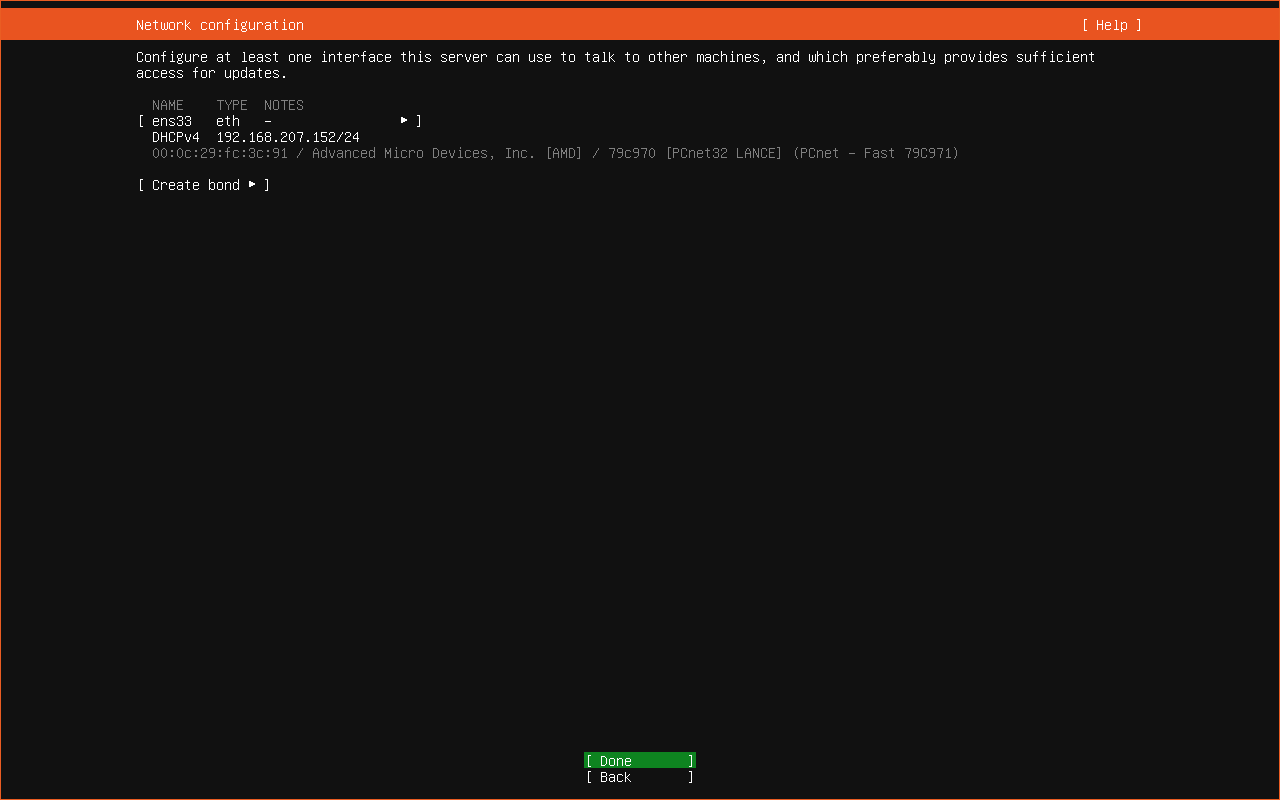
9. Now, it’s for network configuration. The installer can automatically configure at least one interface this server can use to talk to other machines and this can also provide quick and sufficient access for updates. You don’t need to enter anything on this screen.
However, if there is no found network, the installer will process it anyway. The influence is that the system won’t check for updates when interwork is not available. Don’t worry. You can configure networking after installing Ubuntu Server.
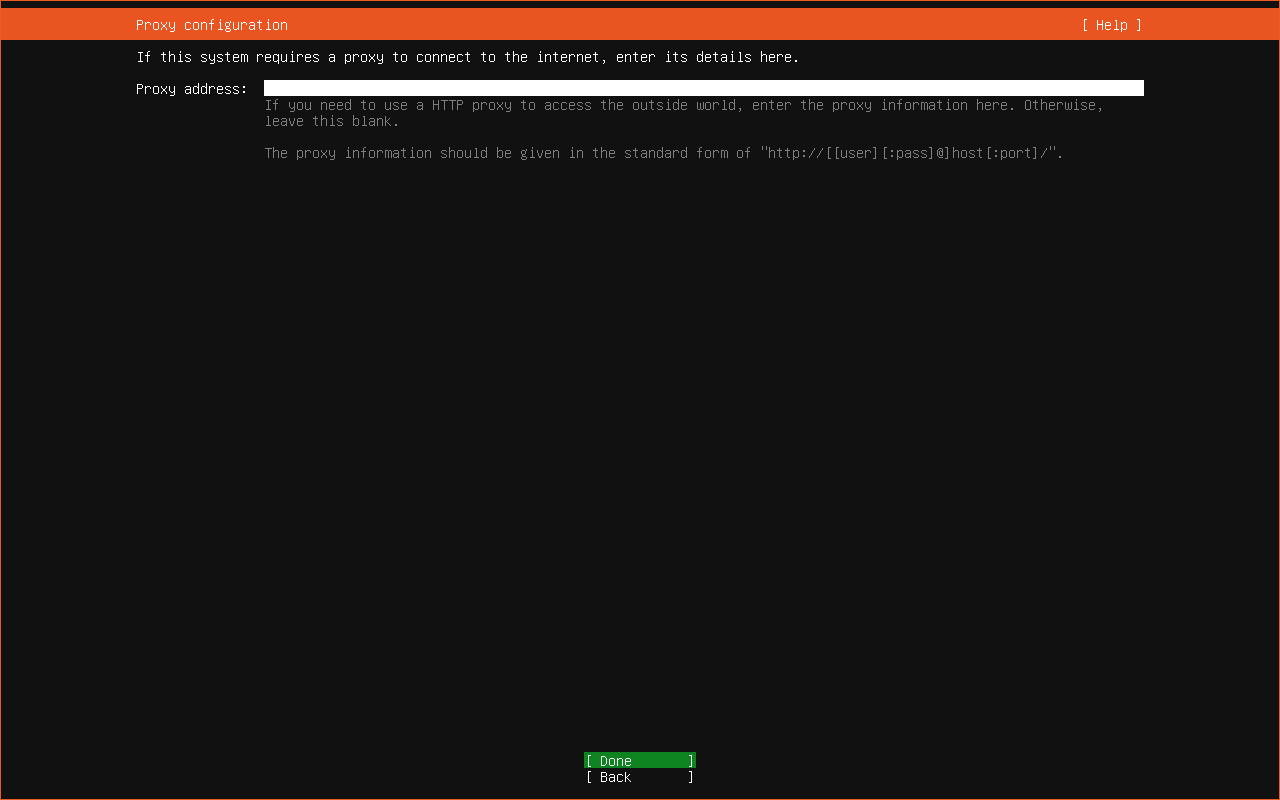
10. Next is the Proxy configuration screen. You need to enter a proxy address here if the system requires a proxy to connect to the internet. However, if you don’t know what to do here, you can just press Enter to continue.
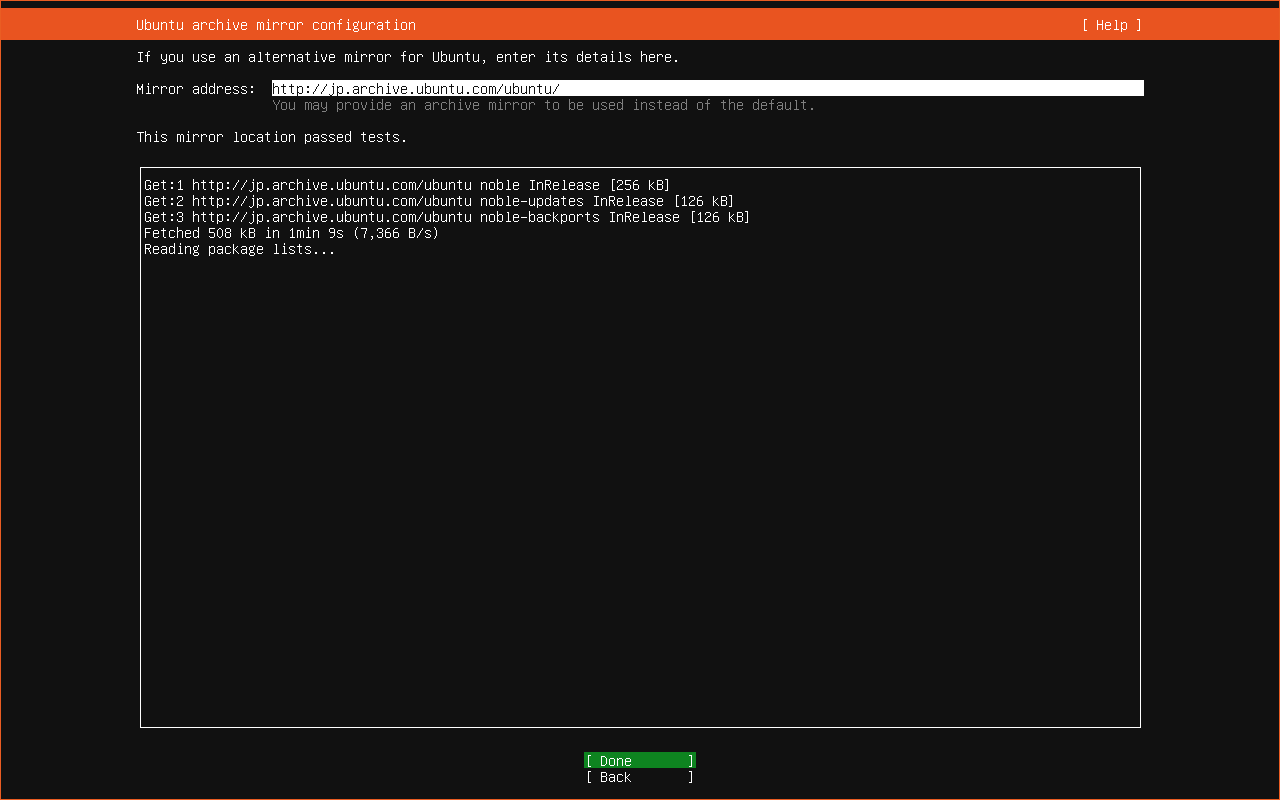
11. The installer can automatically detect and enter the mirror address. However, the mirror location will be tested and this process will last for a while.
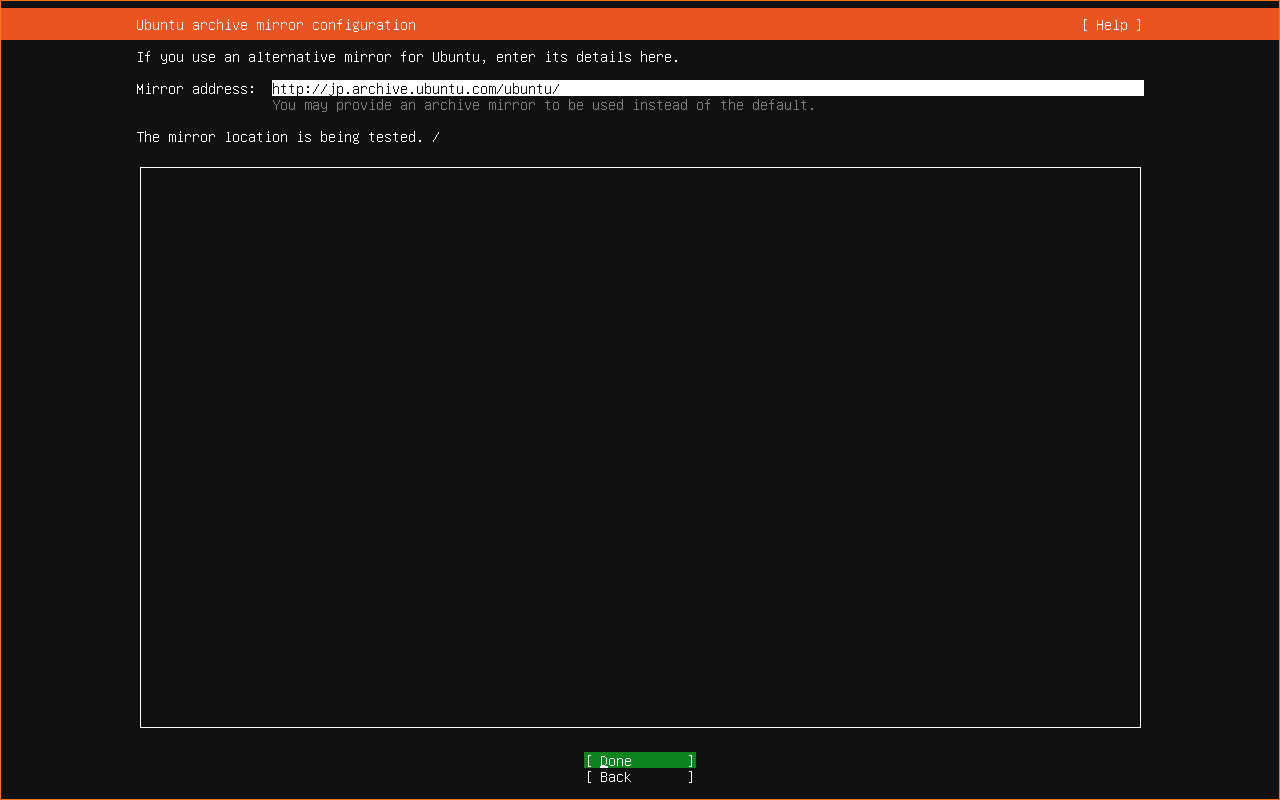
When the mirror location passes the tests, the installer will begin to read package lists. When the reading process ends, press Enter to continue.
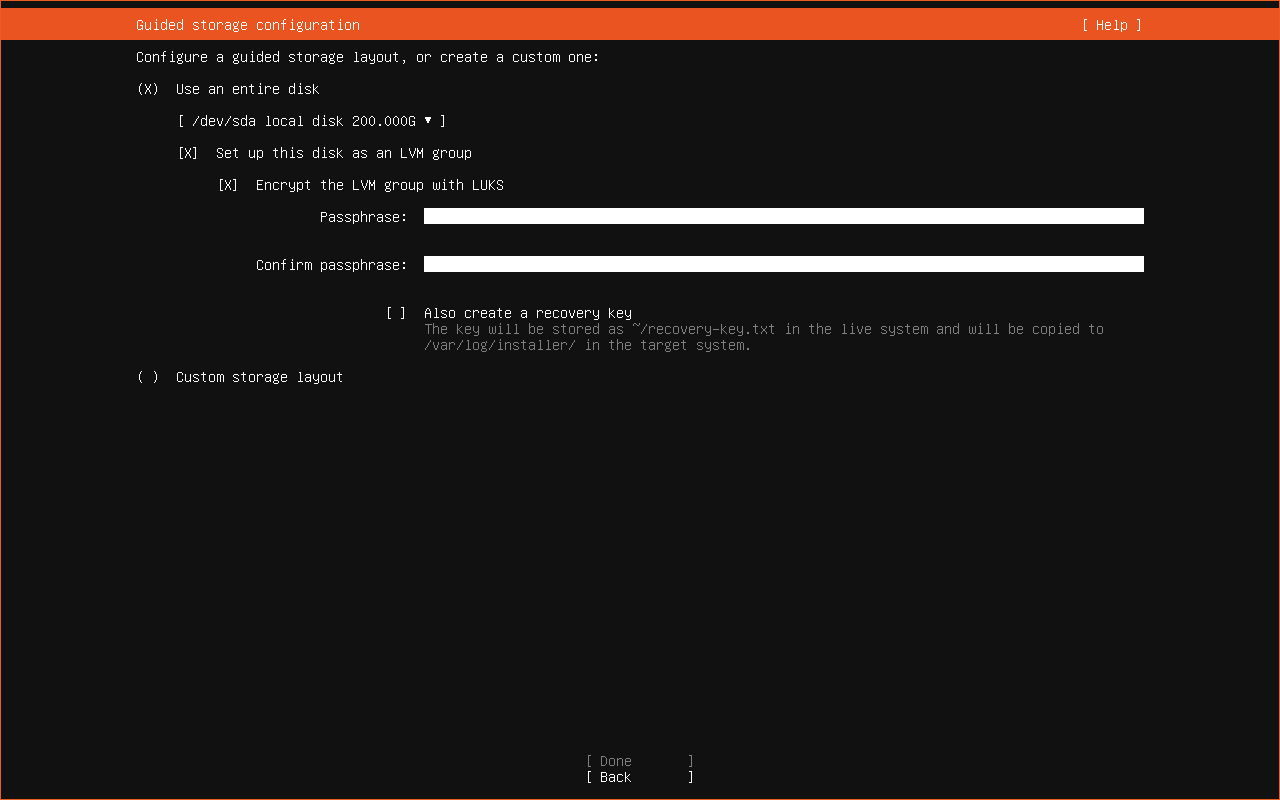
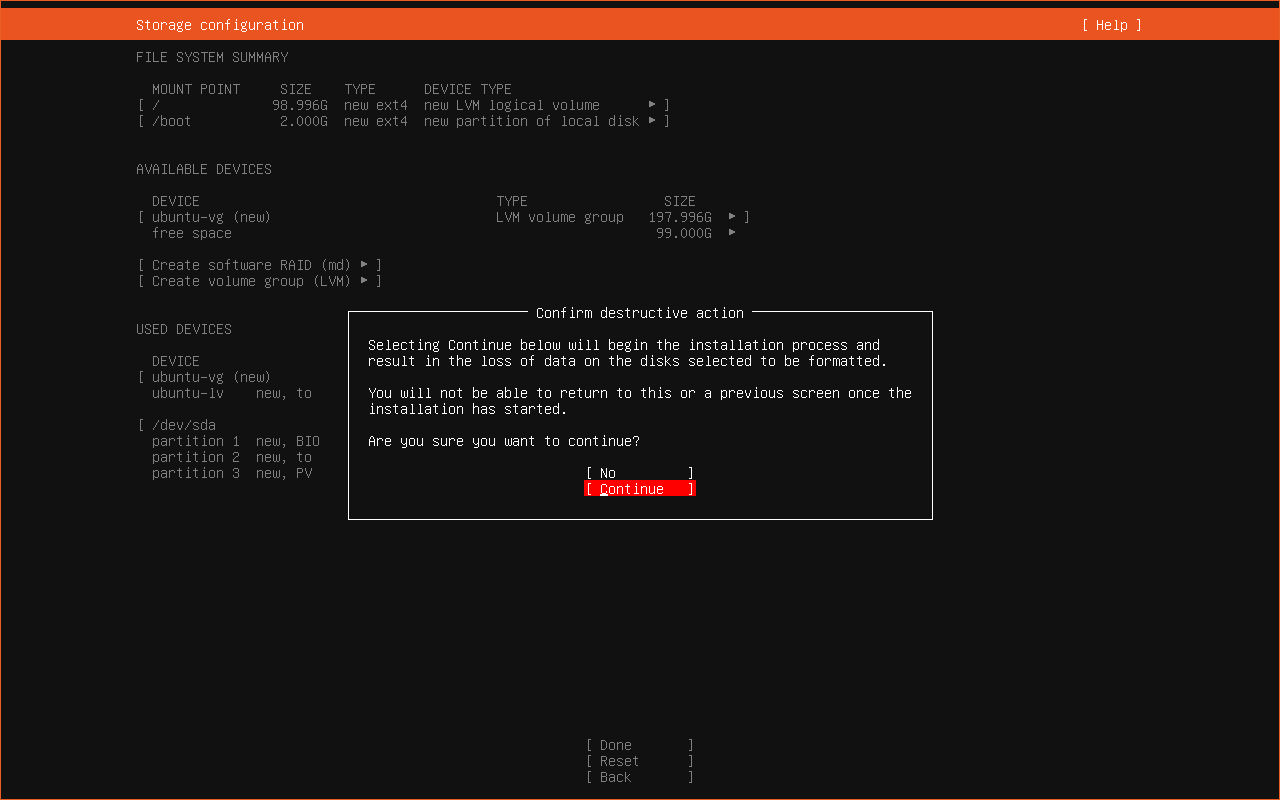
12. Configure the storage according to your requirements. Here are two available options: Use an entire disk and Custom storage layout.
Use an entire disk: If you select this option, you are allowed to set up this disk as an LVM group. You can also encrypt the LVM group with LUKS (Linux Unified Key Setup). Thus, you need to set passphrase for the disk. Here is another option: Also create a recovery key. Set on if you want. Next, highlight Done and press Enter to continue.
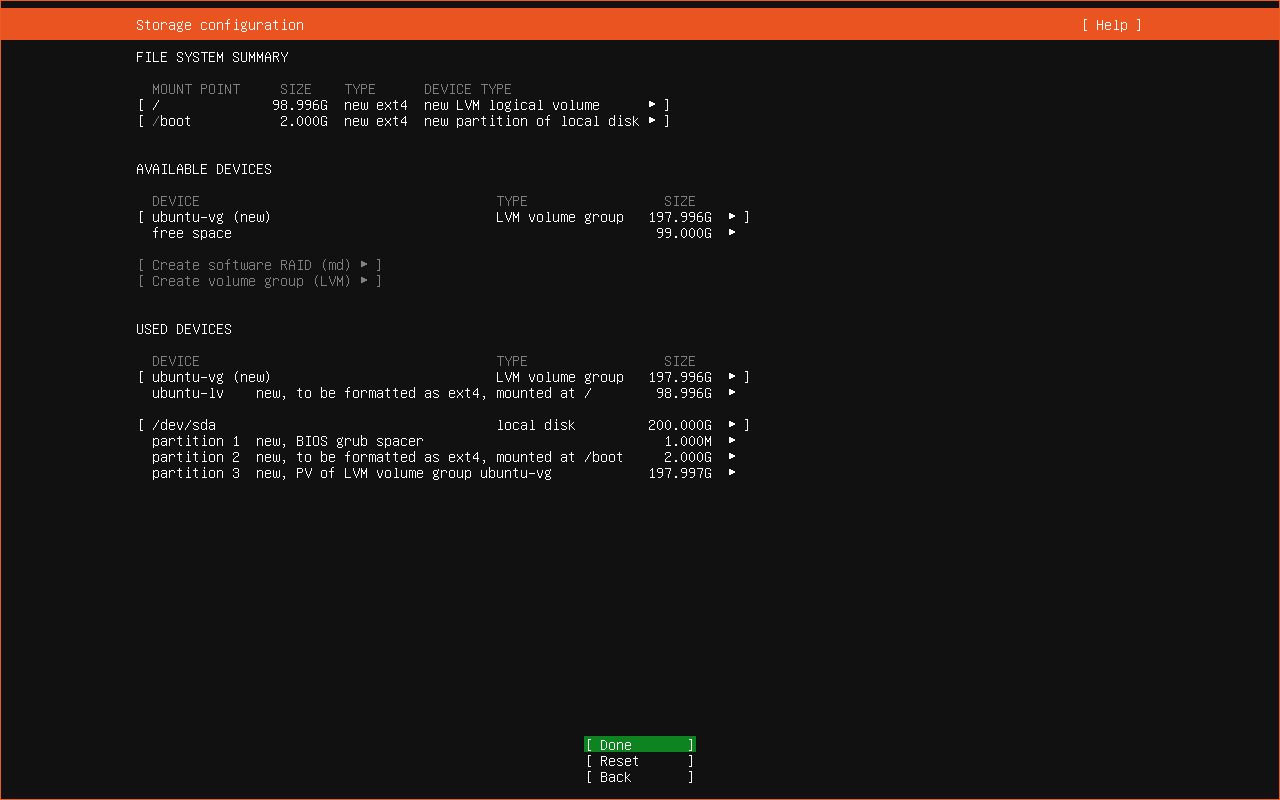
Preview the storage configuration. Here, you still can make some changes according to your requirements. When everything is OK, highlight Done and press Enter to continue.
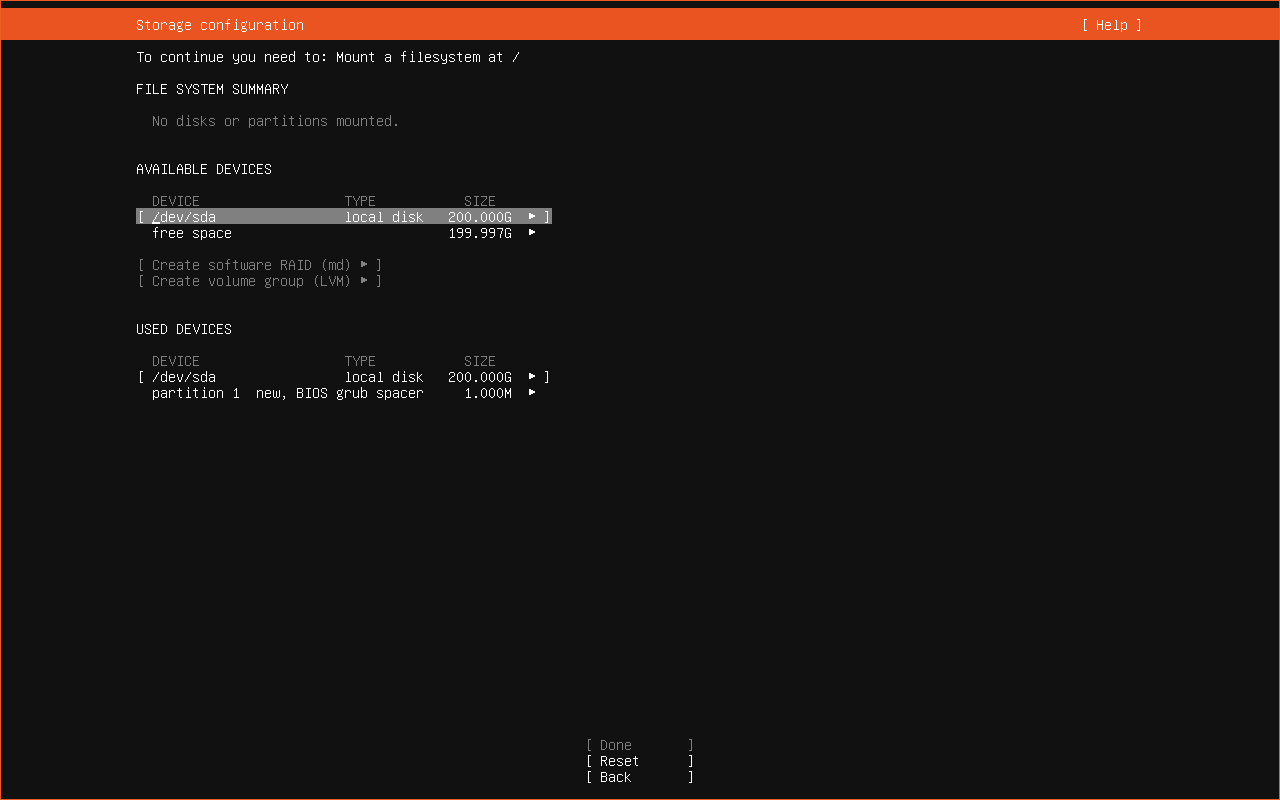
Custom storage layout: If you select this option, you need to mount a file system and select a boot disk yourself. After the settings, highlight Done and press Enter.
13. When you see the following interface, use the ↑ and ↓ keys to highlight Continue and press Enter.
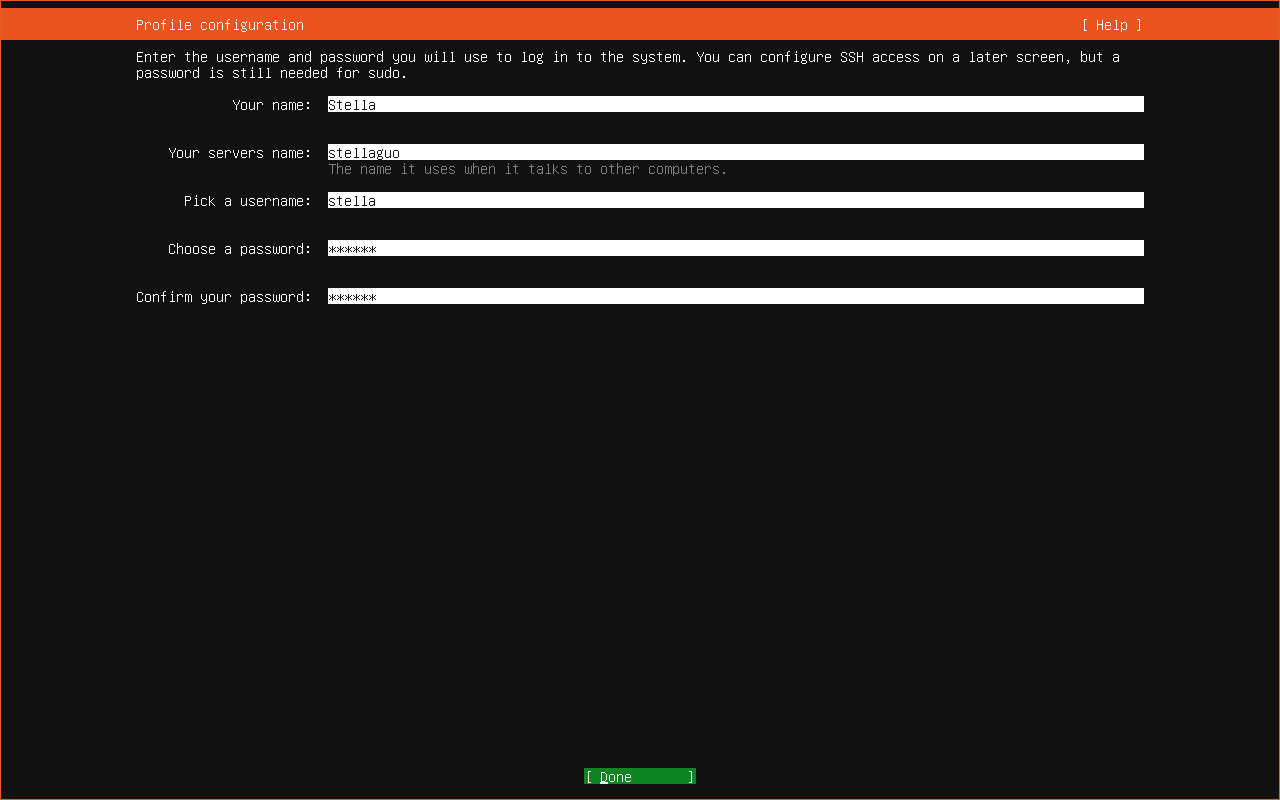
14. On the next page, enter your username, server name, and password. Then, highlight Done and press Enter.
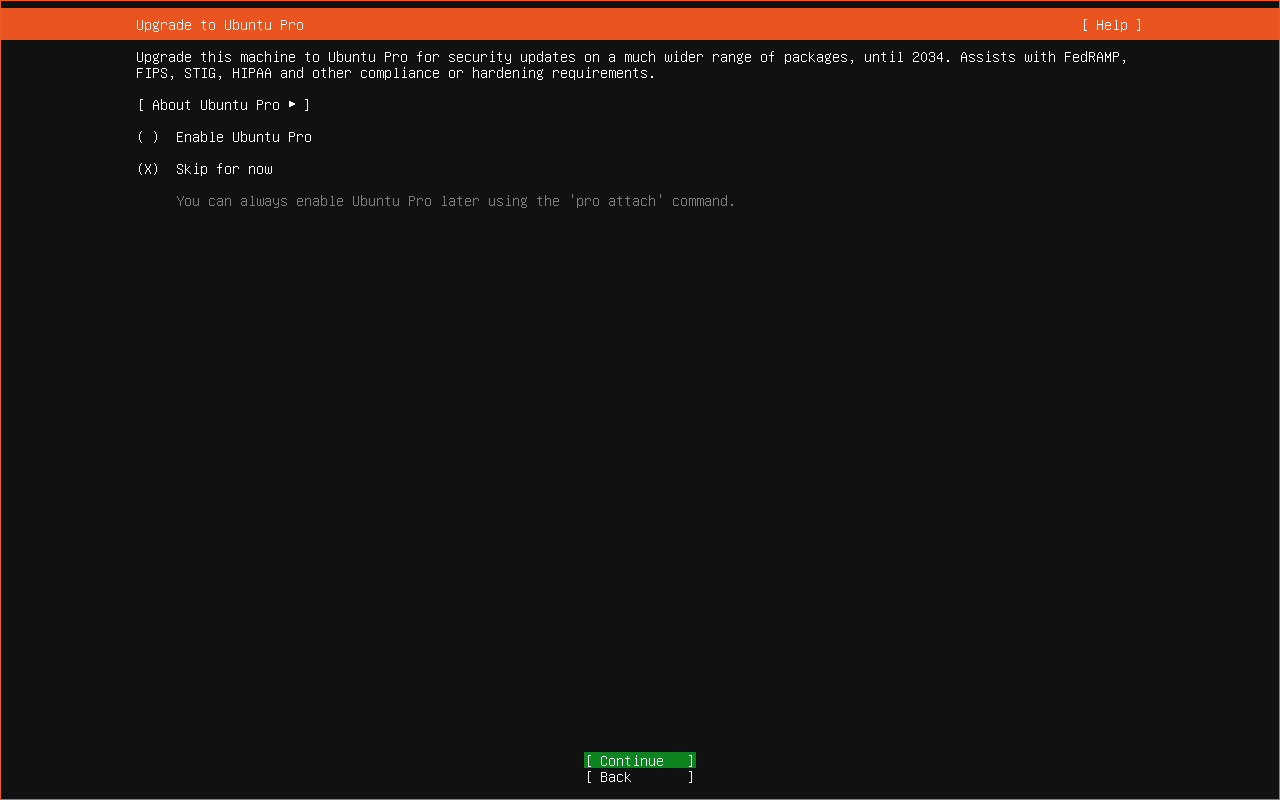
15. On the next page, you can choose to upgrade to Ubuntu Pro or not. Select Enable Ubuntu Pro or Skipp for now, then highlight Continue and press Enter.
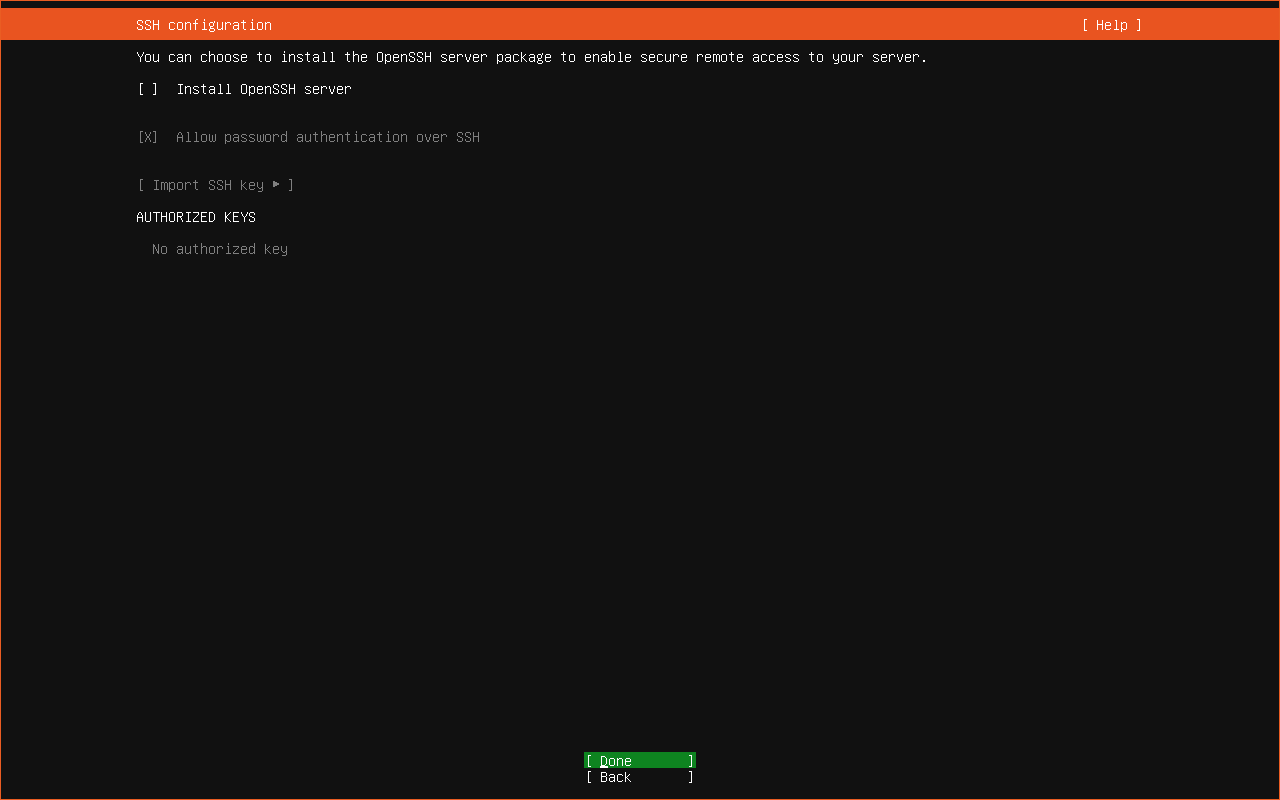
16. You can choose to install the OpenSSH server package to enable secure remote access to your server. Of course, you can also choose to not select the Install OpenSSH server option. Then, select Done and press Enter to continue.
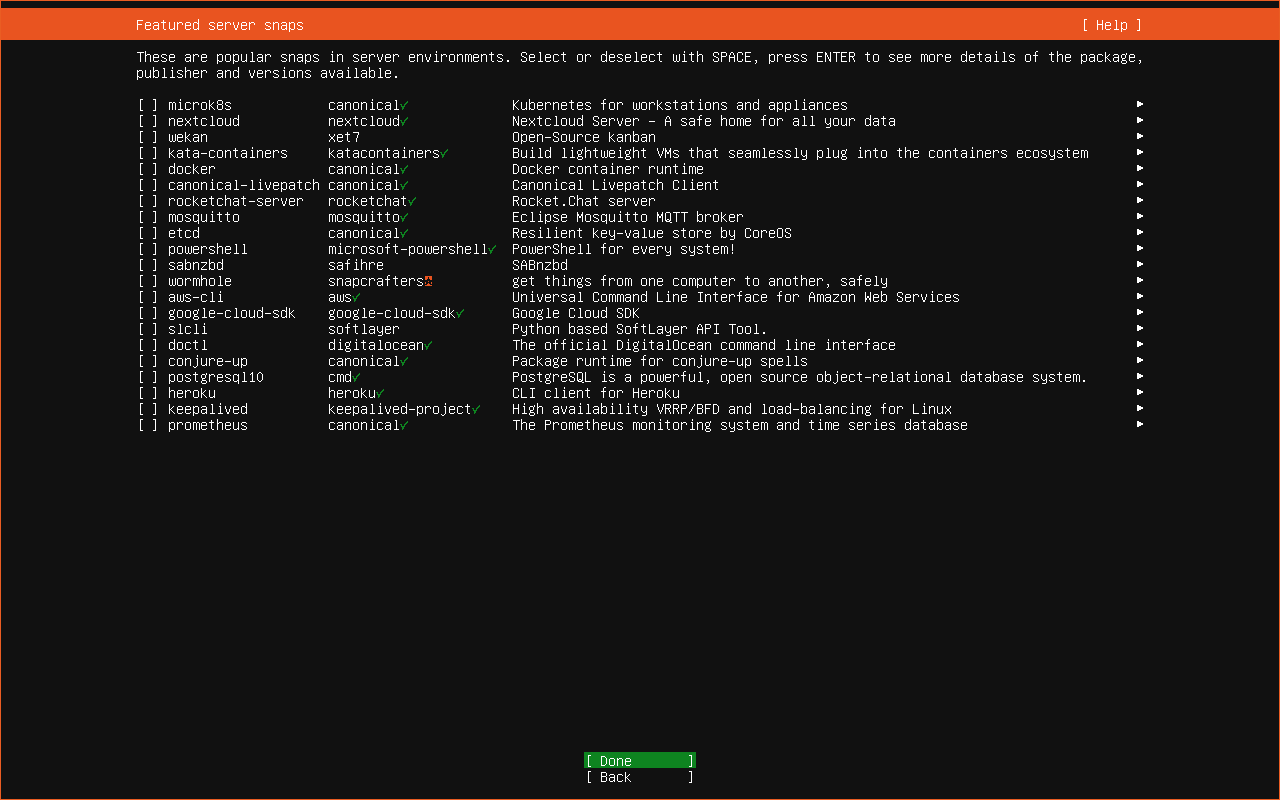
17. The next page will display some popular snaps in server environments. You can select or deselect them with the space key. Then highlight Done and press Enter to continue.
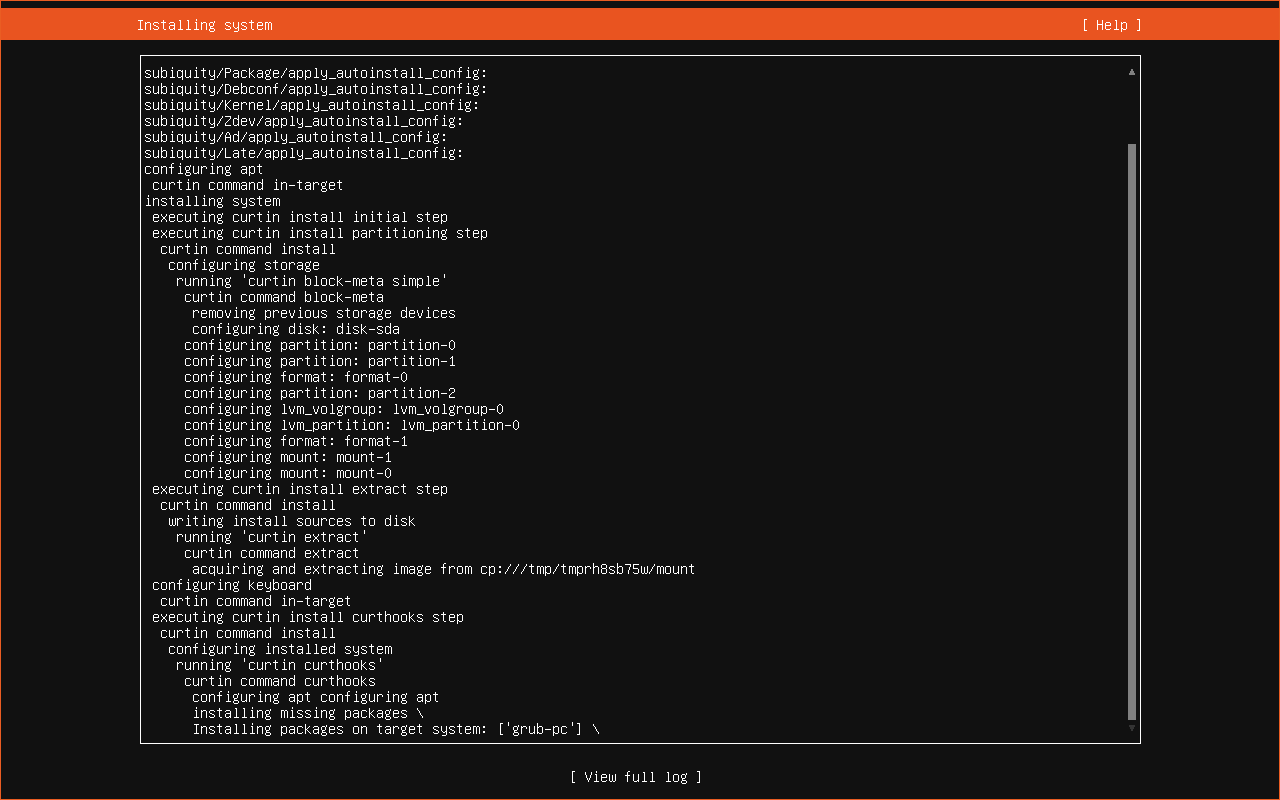
18. The installer starts installing and updating the system. The whole Ubuntu Server installation process will take a few minutes. You can leave it alone and do other things (not on this device).
When the installation ends, you need to remove the bootable Ubuntu USB from your device, highlight Reboot now, and press Enter to restart the system.

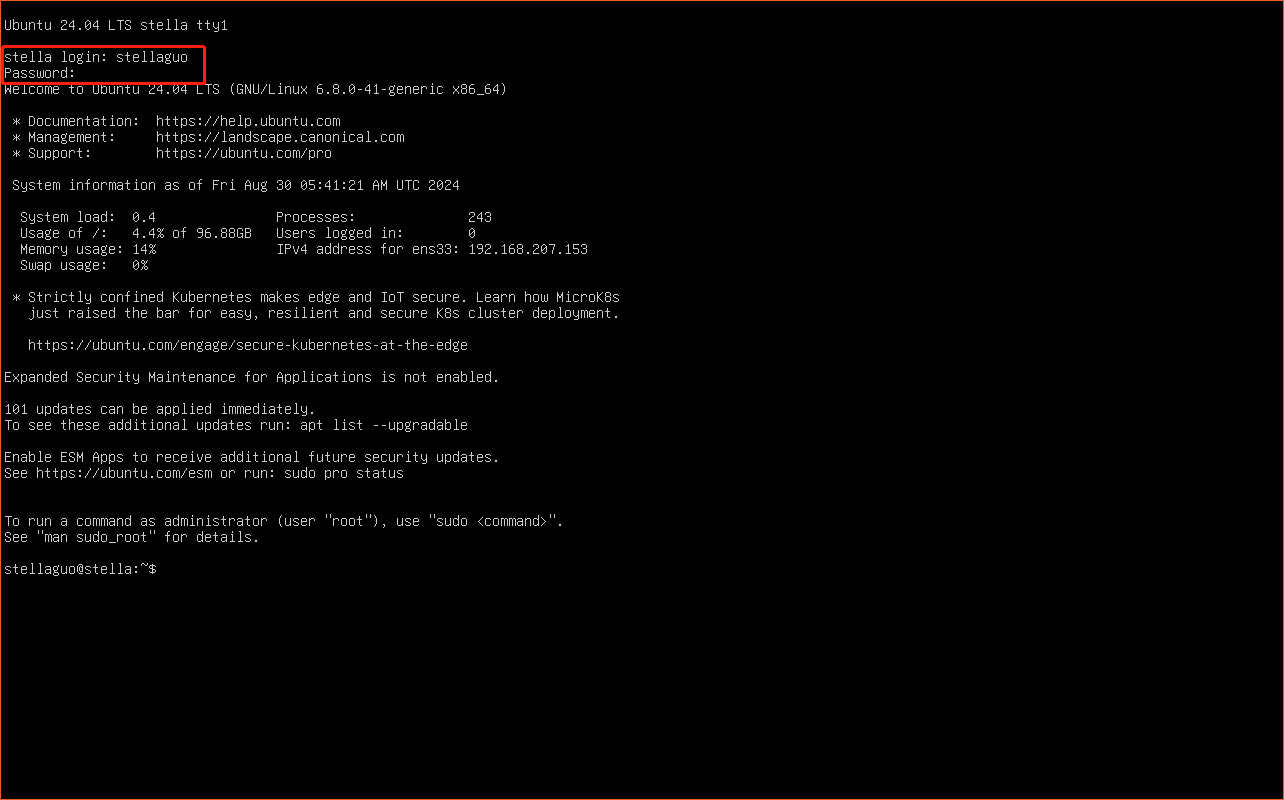
19. The system will boot into the login screen. Then, you need to enter your server username and press Enter. Next, you can see that the system requires you to enter the password. Just enter the password you have set and press Enter. The password will not be displayed on the screen.
After installing Ubuntu Server, you can proceed with building the file server or multi-node cluster. However, if you are a beginner of Ubuntu Server, you can first read the Ubuntu Server documentation. After accessing that page, you can find the step-by-step guides covering key operations and common tasks, the discussion and clarification of key topics, as well as package specifications, APIs, and architecture.
Conclusion
Unlike installing Ubuntu desktop or other operating systems, Ubuntu Server installation is based on a text-based setup. Thus, many new users may think it is difficult to do the installation. However, after reading this guidance, you will find that it is a straightforward process.
You just need to download the Ubuntu Server ISO image and use a special tool to build a bootable Ubuntu Server medium, and then use this medium to install Ubuntu Server. After the installation, you can feel free to experience this system.
About The Author

Position: Columnist
Stella is an experienced news reporter at NewsPivot. She focuses on computing and mobile device issues like Linux and Android. As an English Editor, she has more than 14 years’ experience. Hope her articles can answer your questions.