The Blue Screen of Death is a frequent error that shows up on Windows. It comes with a variety of error messages. In this NewsPivot post, we will focus on the VIDEO_TDR_FAILURE Error that occurs on Windows 10 and provide some effective solutions. If you are facing this problem, read on to solve it.
What Is VIDEO_TDR_FAILURE
Users often report that after upgrading to the latest Windows 10 version or updating the graphics card driver, a blue screen of death (BSOD) will appear when the computer starts. Typically, a blue screen is accompanied by the error message VIDEO_TDR_FAILURE.

If you see a VIDEO_TDR_FAILURE error message, it means that either your graphics card or graphics card driver is not functioning correctly. This issue can be caused by atikmpag.sys, nvlddmkm.sys, or igdkmd64.sys files. The target fault driver can usually be identified in the brackets behind the error message of VIDEO_TDR_FAILURE. For example, VIDEO_TDR_FAILURE(atikmpag.sys).
Besides, this issue may also occur after the computer restarts unexpectedly.
Why VIDEO_TDR_FAILURE Appears on Windows 10
Many situations can cause this Windows 10 VIDEO_TDR_FAILURE error. Some of the main reasons are listed as follows:
- The display driver is outdated.
- There are too many programs running in the background.
- Hardware issues such as over-clocked components, insufficient system power, incorrect component compatibility and settings, insufficient system cooling, and defective parts can also cause this issue.
When you boot into the VIDEO_TDR_FAILURE BSOD, you can restart your computer to see if the device boots normally. If not, you can try the solutions in the next part.
How to Fix VIDEO_TDR_FAILURE
#Reinstall or Update the Default Graphics Drivers
Since the computer cannot be started successfully, you need to enter the safe mode to complete this task. After accessing the safe mode, follow these steps to update the drivers:
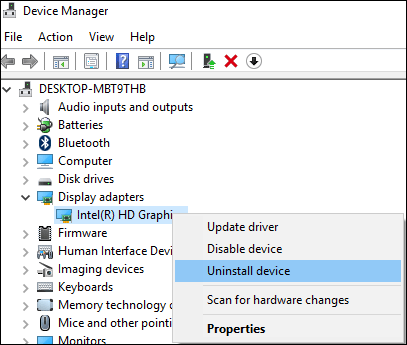
1. Open the Device Manager and unfold the Display adapter section.
2. Right-click the display device and choose Uninstall device.

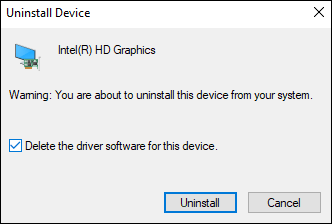
3. If you see the following window, check Delete the driver software for this device and click on Uninstall.

Then, you can restart your computer and see if it starts normally. If the computer boots successfully, you can go to Device Manager and use the Scan for hardware changes option to update the driver to the latest version. Additionally, you can go to the manufacturers’ official site to download and install the latest driver version manually.
#Change the Graphics Settings for Intel HD Graphics
To fix VIDEO TDR FAILURE on Windows 10, you can also change the graphics settings for Intel HD graphics if you’re using Intel Graphics.
Before changing it, you need to download and install the Intel Driver Update Utility from its official website. Then, launch it and check for any available updates. If there is a new update available, follow the instructions provided by the utility to install it.
Next, you can change the graphics settings for Intel HD graphics:
- Right-click the Windows desktop and select Graphics Properties.
- Choose 3D from the control panel.
- Under Application Optimal, select Enable.
- Choose Use Application settings under Anti-Aliasing.
- Turn off Conservative Morphological Anti-Aliasing.
- Click the Balance mode option in general settings.
After completing these operations, you can return to the Graphics Control panel and then do the following:
- Choose Video settings.
- Select Application Settings under Standard Color Correction.
- Click Application Settings under the input range.
- Click on Save profile > Apply.
Conclusion
In this post, we’ve explained what VIDEO_TDR_FAILURE is and offered a guide on how to fix VIDEO_TDR_FAILURE on Windows 10. We hope this method is helpful!