Have you ever encountered the error message saying “The CMOS checksum is invalid, CMOS Reset (502)” when you start your computer? If yes, take it easy. This post on NewsPivot collected multiple feasible solutions to walk you through this issue.
Error: The CMOS Checksum Is Invalid, CMOS Reset (502)
The full name of the CMOS error is “The CMOS checksum is invalid. The CMOS will reset to the default configuration, and the computer will restart. Afterwards, please check the BIOS setup options to see if they change. CMOS Reset (502).”
CMOS refers to the chip that saves the computer’s basic startup information (such as date, time, startup settings, etc.). The CMOS checksum invalid error usually indicates a problem with the computer’s BIOS settings or CMOS battery. For example, low CMOS battery power, BIOS upgrade error, CMOS data corruption, etc. may be the reasons for the CMOS checksum being invalid.
When encountering a CMOS error, your computer may not start properly. Next, we will step by step demonstrate how to solve this problem.
How to Fix The CMOS Checksum Is Invalid Error
Solution 1. Clear CMOS
As mentioned above, the “The CMOS checksum is invalid” error may be caused by corrupted or damaged CMOS data. To address it, you need to reset or clear CMOS.
The method of clearing CMOS varies depending on the computer model and motherboard. You need to visit the computer manufacturer’s official website and get the specific steps according to the computer model. We will show you the steps to clean CMOS by taking reinstalling the CMOS battery for example.
- Remove any peripheral devices connected to the computer, and then turn off the computer.
- Disconnect the computer from the outlet.
- Remove the computer cover.
- Find the battery on the board and remove it.
- Wait 1 – 5 minutes.
- Reconnect the battery to the computer and close the computer cover.
- Reconnect the power and restart the computer. Now you can check if the invalid CMOS issue is resolved.
Solution 2. Replace CMOS Battery
If resetting the CMOS battery does not resolve the problem, the battery itself may be faulty. In this case, you need to consider replacing the battery with a new one.
Solution 3. Perform an Automatic Repair
Windows provides an automatic repair function designed to help solve computer system-related problems. In the event that your computer won’t boot, you’ll need to run Windows Automatic Repair to troubleshoot the problem by creating a boot disk.
To use this method, you need to have a USB drive and a working computer.
Step 1. Insert a USB drive that does not contain any important files into your functioning computer. After that, you need to create a Windows installation media.
Step 2. Insert the installation media into the problematic computer and boot from it.
Step 3. When you see the Windows installation page, select the language and other information, then click Next.
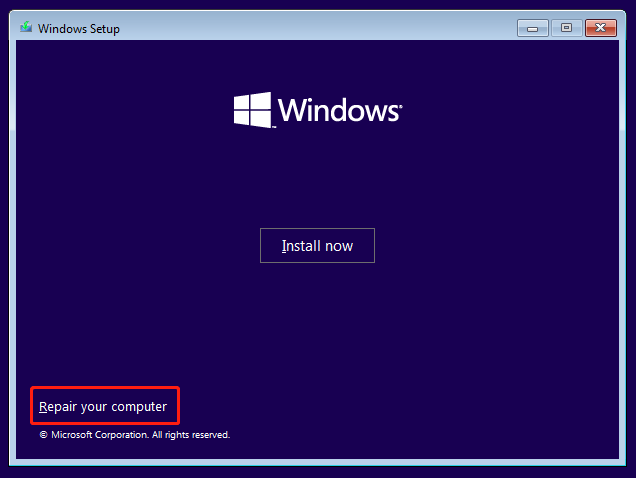
Step 4. In the following window, click Repair your computer.

Once the process is completed, remove the installation media, then restart your computer, and check if the issue has gone.
Solution 4. Update BIOS
If CMOS checksum errors persist, updating the BIOS may help.
BIOS update steps vary depending on the computer’s brand and model. Please visit the computer manufacturer’s official website for detailed tutorials. Additionally, updating BIOS is a risky operation and may lead to more serious problems. Please strictly follow the official tutorial and do so at your own risk.
Bottom Line
To sum up, this post explains how to fix CMOS checksum error on Windows. You can try to clear CMOS, replace the CMOS battery, carry out an automatic repair, and update BIOS. Hope you can get rid of this annoying issue.