Many users complain about the “Visual Studio IntelliSense not working” issue in Windows 10/11. Don’t worry if you encounter the same issue. In this post, NewsPivot introduces how to solve this annoying issue in detail. Go through the following content.
Visual Studio IntelliSense Not Working
IntelliSense is a code-completion tool that was developed by Microsoft with various features, including List Members, Parameter Info, Quick Info, and Complete Word. It’s built into Visual Studio and Visual Studio Code (VS Code) and is available for JavaScript, JSON, CSS, SCSS, TypeScript, HTML, and Less.
With Visual Studio or VS Code IntelliSense, you can execute coding tasks more easily and efficiently. However, this tool does not always run well and sometimes you may find Visual Studio IntelliSense or Visual Studio Code IntelliSense not working.
What if you run into the “IntelliSense not working Visual Studio/VS Code” issue? How can you fix it? To assist in solving the problem, this post provides you with some feasible ways below.
Fixes for Visual Studio IntelliSense Not Working
There are multiple troubleshooting fixes that may help with the “Visual Studio IntelliSense not working” issue.
Fix 1: Perform a Restart
A simple restart can often repair temporary glitches or bugs effectively. So, when you are experiencing the “Visual Studio/VS Code IntelliSense not working” issue, try restarting the problematic program first. If the issue persists after you restart Visual Studio or VS Code, move on to other solutions.
Fix 2: Install Extensions
A lack of extensions may randomly lead to the “Visual Studio Code IntelliSense not working” issue. To fix it and get a richer experience, you need to install an extension specifically for a programming language. To do this, follow the steps below.
Step 1: Open Visual Studio Code and then go to the Extensions Panel.
Step 2: Search for Intellisense + [LanguageName], e.g. Intellisense Python.
Step 3: After that, choose a desired extension from the search result and click Install to install it from the specific language.
Fix 3: Update Visual Studio or VS Code
It’s also possible for you to get rid of the “Visual Studio IntelliSense not working” or “VS Code IntelliSense not working” issue by updating the failing program. You can easily update Visual Studio or VS Code with the given instructions.
For Visual Studio
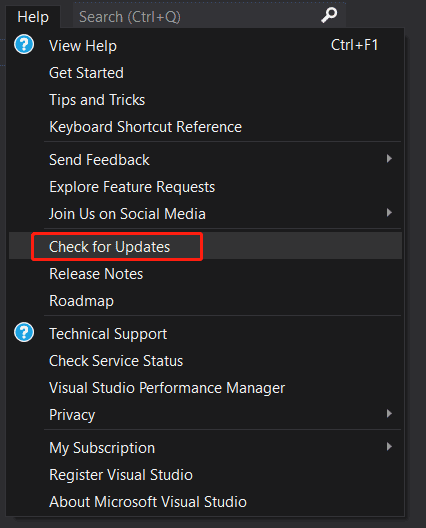
Step 1: Open Visual Studio and go to Help > Check for Updates. Then the program will scan for available updates.

Step 2: For any updates listed in the Update available window, click Update to get them.
For VS Code
Step 1: Open the VS Code tool and click the Settings icon in the lower-left corner.
Step 2: After that, select Check for Updates from the context menu to update the program.
Fix 4: Reinstall Visual Studio or VS Code
If none of the above methods resolves the “IntelliSense not working Visual Studio/VS Code” issue, it may indicate there is something wrong with the program installation. To fix it, you’d better uninstall this tool and then install it back.
You can open Control Panel and click Uninstall a program under Programs to remove Visual Studio/VS Code from your PC. Then refer to the guides below to reinstall the specific program.
Bottom Line
This post shows you how to fix the “Visual Studio IntelliSense not working” issue. When you are stuck in the same issue, try to fix it with the above workarounds.