Like other components of a computer, there might be something wrong with the computer screen. Vertical lines on monitor issue are a prominent one. Why are vertical lines appearing on your computer monitor? How to fix that issue? After reading this post offered by NewsPivot, you will find the answer!
The Lines on Computer Scree Issue
You may find that your monitor or computer screen is not working properly when you use your computer. For instance, the monitor is not displaying the full screen, which we have talked about in our previous article. What’s more, some of you may experience a problem with lines on computer screen. The lines can be vertical or horizontal lines with various colors like blue or white. It is an annoying thing to encounter that issue.
You may wonder why my computer screen has lines running through it. Lines on computer screens are caused by many reasons, such as outdated graphics card drivers, incorrect video cable connections, defective ribbon cables, damaged screens, and others. In the following content, we will show you some feasible solutions to fix the vertical lines on monitor issue.
Also read: How to Fix Windows 11 Not Detecting Second Monitor?
Fix Vertical Lines on Monitor in Windows 10/8/7
Solution 1. Adjust the Screen Resolution Settings
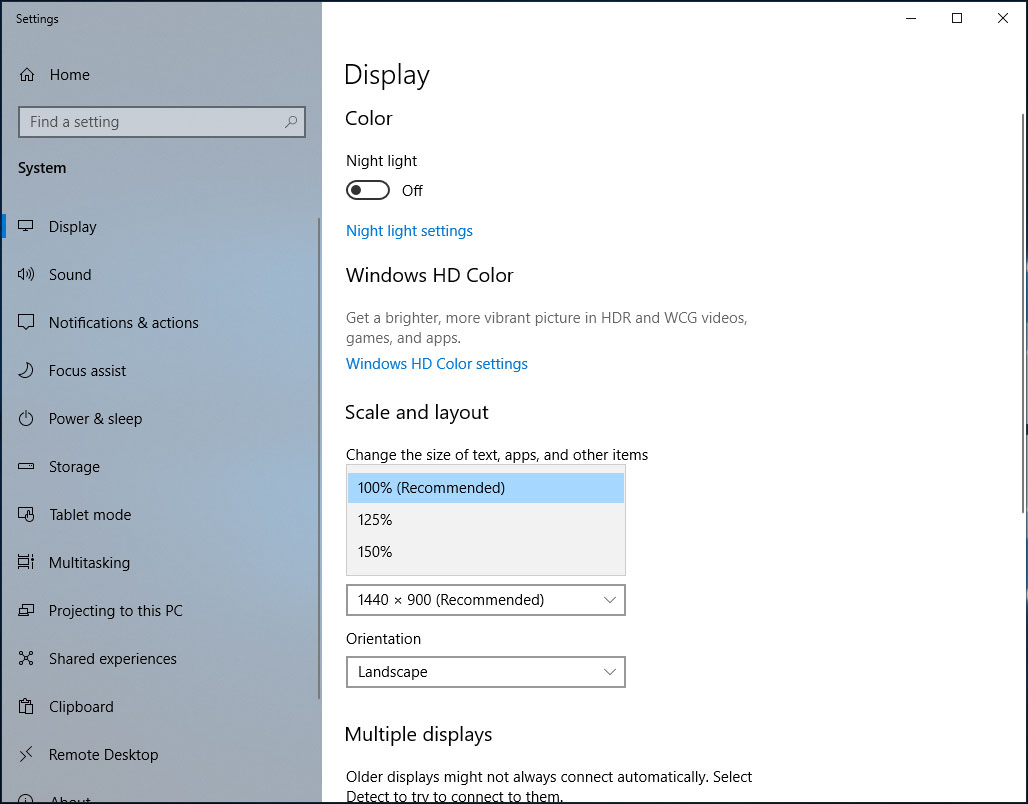
The monitor vertical lines issue may be caused by the incorrect screen resolution settings. You can try to adjust the settings to troubleshoot the issue. Here’s how:
Step 1. Right-click on the empty place of your desktop and select the Display settings option.
Step 2. Navigate to the Scale and layout section, expand the Resolution dropdown, and choose the resolution marked Recommended.

Solution 2. Upgrade the Graphics Card Driver
The outdated or incompatible graphics card driver is one of the main reasons for the vertical lines on monitor issue. In this case, you need to update the driver.
Step 1. Identify the manufacturer of your computer’s graphics card and go to its official website.
Step 2. Then go to its download or support page to get the latest driver.
Step 3. Install the latest driver on your computer. Finally, restart your computer and see if you can still see the vertical lines.
Besides, you can go to Device Manager to update the card driver. For more details, you can read this post: How to Update Drivers in Windows 11?
If the vertical lines on the monitor cannot be resolved using the above two methods, then the problem may be caused by hardware issues. Read on for the solution below.
Solution 3. Reconnect the Video Cable
If you connect the video cable incorrectly, the vertical lines on computer screen issue may appear. To solve that issue, you can try to reconnect the video cable and check if the lines disappear.
Solution 4. Replace the Ribbon Cable
Sometimes lines on the monitor can be related to the ribbon cable that connects the laptop screen to the motherboard. Over time, the cables may wear out or even break. You can try to replace the ribbon cable with a new cable with the same connection type.
Solution 5. Disconnect All Peripheral Equipment
You can try turning off the computer and unplugging all peripherals. If you are a laptop user, you can flip it over and slide the battery release latch to remove the battery. Next, to clear all remaining power, you need to press and hold the power button for 15 to 20 seconds. Later, you should reconnect your devices and restart the system to check if there are lines on computer screen.
If all the above solutions can’t fix that issue, you’d better go to the after-sales service shop to ask for help.
Final Words
How to fix vertical lines on monitor in Windows 7/8/10? The above has shown you 5 useful solutions. When you encounter that issue, you can try the above solutions to troubleshoot it.