The Libraries folder functions well in organizing files for Windows users. However, Windows 10 does not get Libraries enabled by default. Now you can read this post on NewsPivot to learn how to manage Libraries in File Explorer, including how to enable it.
Significance of Managing Libraries in File Explorer
Libraries is a virtual folder in any version of Windows. It can collect documents from diverse locations and present them in a single collection. This means you can put files from different locations, including your internal hard drives, external drives, or Internet locations into Libraries.
The main advantage of this function is that you can view the specific file type and add or remove folders according to your reference regardless of their actual location. In Libraries, the content, such as documents, photos, videos, or music, can be sorted and displayed the way you want. For example, you can use the properties of items in a library to organize the contents of the library so that related items are sorted together even if they are stored in different folders.
It can bring the following benefits to you if you manage Libraries on Windows 10:
- You can decide where to store files. At the same time, the Libraries provide sensible defaults for those who don’t want to spend too much time on file storage location on their computers. You can decide how much control you want to execute over where and how the content is stored.
- It provides a consistent interface. It offers the same experience as Windows Explorer. Seamless interaction can be easily realized when using the program.
Also read: How to Fix “Video File Cannot Be Played” – Error Code: 232011
How to Manage Libraries in File Explorer
In the following guide, I will show you the methods to manage Libraries in File Explorer. It includes how to enable/disable Libraries, add or remove files/folders, and create a new library in File Explorer.
Method 1: Enable/Disable Libraries in File Explorer
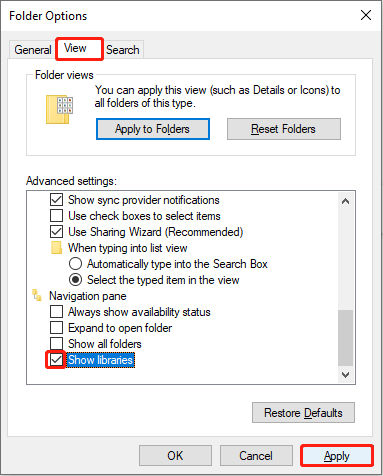
As mentioned above, the Libraries folder is not enabled by default. Therefore, before using this folder for file/folder merging and filtering, you should first enable it manually. Here are the steps:
Step 1: Right-click on the Start button and select File Explorer.
Step 2: Click on View, and then click on Options.
Step 3: Switch to the View section.
Step 4: Under Advanced settings, scroll down and check Show libraries.
Step 5: Click on Apply.

After you finish these steps, the Libraries folder will appear in the left pane with the default groups for Documents, Music, Pictures, and Videos.
Read More: File Explorer Address Bar and Menu Bar Are Missing
Method 2: Add a Folder to Libraries
When you want to add a new folder to Libraries, you can use the following guides:
Step 1: Open File Explorer.
Step 2: In the left pane, click on the small arrow in front of Libraries to expand it.
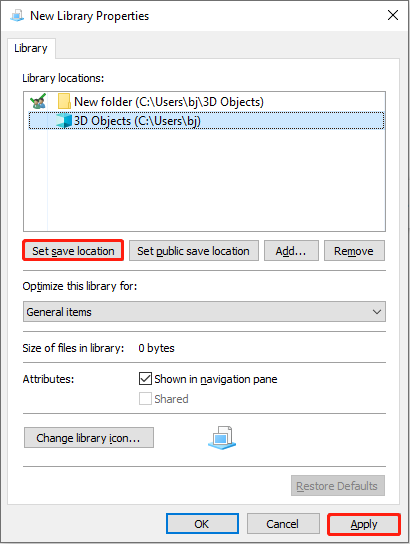
Step 3: Under the Libraries section, choose the group you want to add a folder in, right-click on it, and then select Properties.
Step 4: Click on the Add button to select the folder or network location.
Step 5: Select the folder you recently added.
Step 6: Click on Set save location > Apply > OK.

Once you completed these steps, the new files/folders will be added to the Libraries on File Explorer.
Method 3: Remove a Folder From Libraries
Here are some instructions to remove a folder from Libraries:
Step 1: Open File Explorer.
Step 2: In the left pane, choose the folder you want to remove from Libraries, and then right-click on it and select Properties.
Step 3: Select the folder you want to remove and click on the Remove button.
Step 4: Click on Apply > OK.
After you complete these steps, the folder will be removed from the Libraries.
Method 4: Create a New Library
Creating a new library is one of the steps to manage Libraries. The instructions are as follows:
Step 1: Open File Explorer.
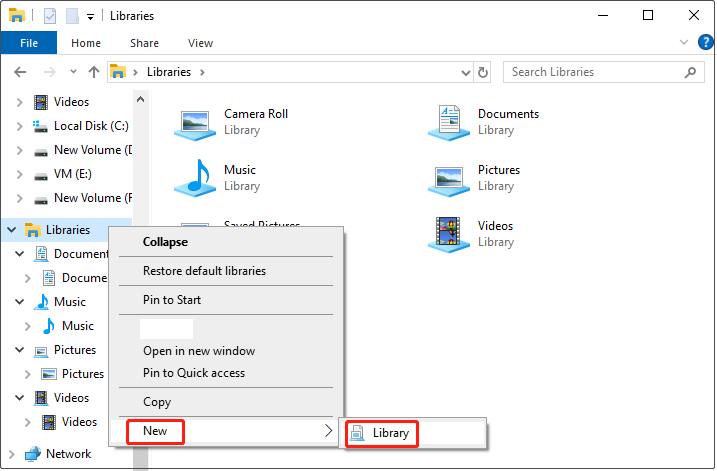
Step 2: In the left pane, right-click on Libraries, and select New > Library.

Step 3: Create a name for the new library and press Enter.
Step 4: Right-click on the new library and select Properties.
Step 5: Click the Add button.
Step 6: Select the folder or network location.
Step 7: Click on Include folder > Apply > OK.
When you finish these operations above, you have created a new library successfully.
Related Post: What to Do if File Explorer Keeps Opening by Itself in Windows
Wrapping Things Up
Learning how to manage Libraries makes it easier for you to find file-based content stored in different folders or on different computers. This article lists several tips to manage Libraries in File Explorer. You can enable Libraries according to the instructions above to enjoy more convenient file access and management.